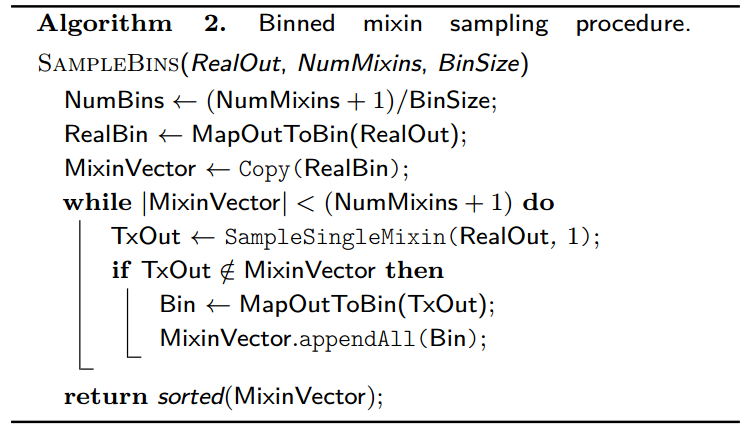
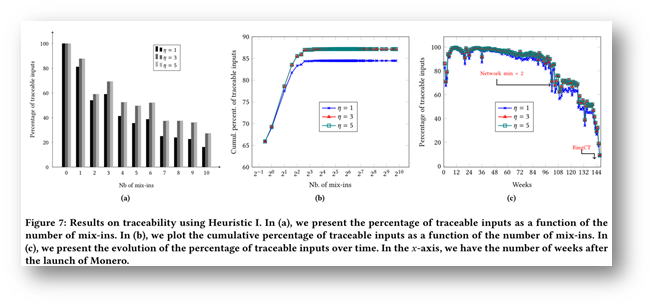
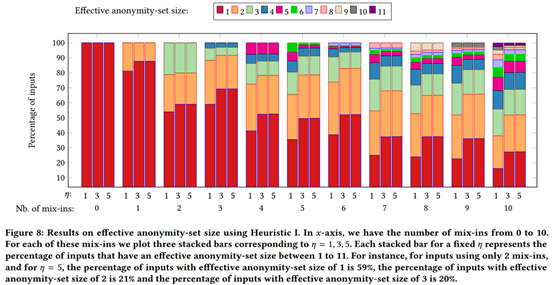
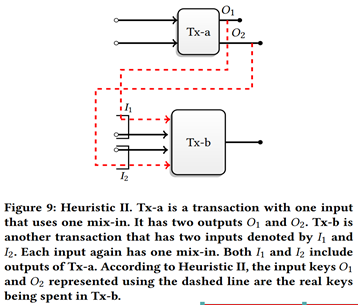
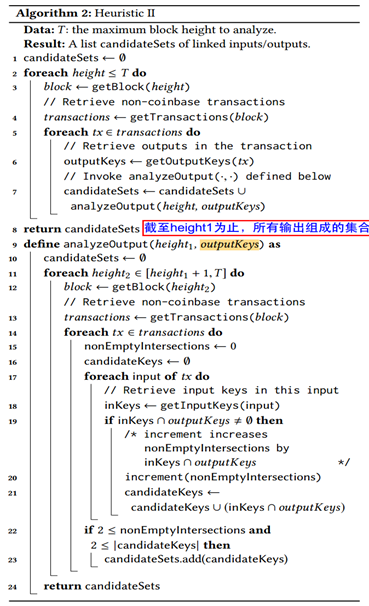
HuZhenXing

与其感慨路难行,不如马上出发!


  • 首页

  • 分类

  • 归档

  • 关于

  • 标签

比特币中Txid和Txhash的区别

发表于 2019-04-15 | Edited on 2023-03-05 | 分类于 区块链技术研究

比特币中Txid和Txhash的区别

在比特币中为什么有些交易的txid 和txhash相同,但是有些交易的txid 和txhash又不同,这其中到底是为什么?

这是因为比特币中隔离见证(Segregate Witness, segwit)技术的引入导致的这个问题.

  • 如果一笔交易是segwit 的交易,那么这笔交易计算txid的过程中不包括witness data,但是txhash是在计算hash的过程中包括witness data. witness data只的是交易中ScriptSig(交易中用户的签名和公钥).
  • 如果一笔交易是非segwit的交易,那么txid 和txhash是相同的.

隔离见证的引入参见比特币bip141提议.
bip141提议计算交易的hash时, 将signature data排除在外, signature data就是上文提到的witness data.

在比特币交易的input中提供的是txid,为什么把witness data排除在外呢?这是因为一笔交易中的输入部分有效的签名有多种形式,恶意节点收到一笔交易T1的时候,可以对交易的签名进行修改,修改之后签名仍然合法,但是整个交易的hash却发生了变化,假设变为了Tx2 恶意节点再将这个交易广播,如果其他节点接受了Tx2并且打包上链,那么Tx1就无法上链,此时发出Tx1的人无法查询到自己的交易上链,接收者让发送者再发送一次交易,这就会导致接收者多次接收交易.

为什么需要隔离见证

这里涉及到交易延展性问题,具体隔离见证的解释,可以参考如下链接:

  • 深入理解隔离见证
  • Transaction Malleability

第二个链接,知乎上前几个回答不靠谱,隔离见证最好的是用来解决交易延展性攻击问题.

参考

stackExchange中的问题

比特币全节点对交易和区块的处理过程

发表于 2019-04-15 | Edited on 2023-03-05 | 分类于 区块链技术研究

交易的处理过程

“tx” messages

  1. Check syntactic correctness
  2. Make sure neither in or out lists are empty
  3. Size in bytes <= MAX_BLOCK_SIZE
  4. Each output value, as well as the total, must be in legal money range
  5. Make sure none of the inputs have hash=0, n=-1 (coinbase transactions)
  6. Check that nLockTime <= INT_MAX[1], size in bytes >= 100[2], and sig opcount <= 2[3]
  7. Reject “nonstandard” transactions: scriptSig doing anything other than pushing numbers on the stack, or scriptPubkey not matching the two usual forms.[4]
  8. Reject if we already have matching tx in the pool, or in a block in the main branch
  9. For each input, if the referenced output exists in any other tx in the pool, reject this transaction.[5]
  10. For each input, look in the main branch and the transaction pool to find the referenced output transaction. If the output transaction is missing for any input, this will be an orphan transaction. Add to the orphan transactions, if a matching transaction is not in there already.
    For each input, if the referenced output transaction is coinbase (i.e. only 1 input, with hash=0, n=-1), it must have at least COINBASE_MATURITY (100) confirmations; else reject this transaction
  11. For each input, if the referenced output does not exist (e.g. never existed or has already been spent), reject this transaction[6]
  12. Using the referenced output transactions to get input values, check that each input value, as well as the sum, are in legal money range
  13. Reject if the sum of input values < sum of output values
  14. Reject if transaction fee (defined as sum of input values minus sum of output values) would be too low to get into an empty block
  15. Verify the scriptPubKey accepts for each input; reject if any are bad
  16. Add to transaction pool[7]
  17. “Add to wallet if mine”
  18. Relay transaction to peers
  19. For each orphan transaction that uses this one as one of its inputs, run all these steps (including this one) recursively on that orphan.

区块的处理过程

  1. Check syntactic correctness

  2. Reject if duplicate of block we have in any of the three categories

  3. Transaction list must be non-empty

  4. Block hash must satisfy claimed nBits proof of work

  5. Block timestamp must not be more than two hours in the future

  6. First transaction must be coinbase (i.e. only 1 input, with hash=0,
    n=-1), the rest must not be

  7. For each transaction, apply “tx” checks 2-4

  8. For the coinbase (first) transaction, scriptSig length must be 2-100

  9. Reject if sum of transaction sig opcounts > MAX_BLOCK_SIGOPS

  10. Verify Merkle hash

  11. Check if prev block (matching prev hash) is in main branch or side
    branches. If not, add this to orphan blocks, then query peer we got
    this from for 1st missing orphan block in prev chain;done with block

  12. Check that nBits value matches the difficulty rules.

  13. Reject if timestamp is the median time of the last 11 blocks or
    before

  14. For certain old blocks (i.e. on initial block download) check that
    hash matches known values

  15. Add block into the tree. There are three cases: 1. block further
    extends the main branch; 2. block extends a side branch but does
    not add enough difficulty to make it become the new main branch; 3.
    block extends a side branch and makes it the new main branch.

  16. For case 1, adding to main branch:

    1. For all but the coinbase transaction, apply the following:

      1. For each input, look in the main branch to find the referenced output transaction. Reject if the output transaction is missing for any input.
      2. For each input, if we are using the nth output of the earlier transaction, but it has fewer than n+1 outputs, reject.
      3. For each input, if the referenced output transaction is coinbase (i.e. only 1 input, with hash=0, n=-1), it must have at least COINBASE_MATURITY (100) confirmations; else reject.
      4. Verify crypto signatures for each input; reject if any are bad.
      5. For each input, if the referenced output has already been spent by a transaction in the main branch, reject.
      6. Using the referenced output transactions to get input values, check that each input value, as well as the sum, are in legal money range.
      7. Reject if the sum of input values < sum of output values.
    2. Reject if coinbase value > sum of block creation fee and transaction fees

    3. (If we have not rejected):

    4. For each transaction, “Add to wallet if mine”

    5. For each transaction in the block, delete any matching transaction from the transaction pool

    6. Relay block to our peers

    7. If we rejected, the block is not counted as part of the main branch

17. For case 2, adding to a side branch, we don't do anything.
18. For case 3, a side branch becoming the main branch:

	1. Find the fork block on the main branch which this side branch forks off of.
	2. Redefine the main branch to only go up to this fork block.
	3. For each block on the side branch, from the child of the fork block to the leaf, add to the main branch:
	
		1. Do "branch" checks 3-11.
		2. For all but the coinbase transaction, apply the following:

			1. For each input, look in the main branch to find the referenced output transaction.Reject if the output transaction is missing for any input.
			2. For each input, if we are using the nth output of the earlier transaction, but it has fewer than n+1 outputs, reject.
			3. For each input, if the referenced output transaction is coinbase (i.e. only 1 input, with hash=0, n=-1), it must have at least COINBASE_MATURITY (100) confirmations; else reject.
			4. Verify crypto signatures for each input; reject if any are bad.
			5. For each input, if the referenced output has already been spent by a transaction in the main branch, reject.
			6. Using the referenced output transactions to get input values, check that each input value, as well as the sum, are in legal money range.
			7. Reject if the sum of input values < sum of output values.
		
		3. Reject if coinbase value > sum of block creation fee and transaction fees.
		4. (If we have not rejected):
		5. For each transaction, "Add to wallet if mine"


	4. If we reject at any point, leave the main branch as what it was originally, done with block.
	5. For each block in the old main branch, from the leaf down to the child of the fork block:

		1. For each non-coinbase transaction in the block:
			1. Apply "tx" checks 2-9, except in step 8, only look in the transaction pool for duplicates, not the main branch.
			2. Add to transaction pool if accepted, else go on to next transaction

	6. For each block in the new main branch, from the child of the fork node to the leaf:
		1. For each transaction in the block, delete any matching transaction from the transaction pool.
	7. Relay block to our peers
  1. For each orphan block for which this block is its prev, run all these steps (including this one) recursively on that orphan

注解

引用

https://en.bitcoin.it/wiki/Protocol_rules


  1. nLockTime must not exceed 31 bits, as some clients will interpret it incorrectly. ↩︎

  2. A valid transaction requires at least 100 bytes. If it’s any less, the transaction is not valid ↩︎

  3. The number of signature operands in the signature (no, that is not redundant) for standard transactions will never exceed two. ↩︎

  4. Note that this is not a hard requirement on clients. ↩︎

  5. Note that this is not a hard requirement on clients. The network-enforced rule is that only one transaction spending a particular output can be in the blockchain, thus preventing double-spending. Technically miners can choose which one they want to put into the block they’re working on as long as no other transaction has spent that output either previously in the blockchain, or in the same block. The in-memory transaction pool can technically be managed in whatever way the miner is willing to implement. ↩︎

  6. This is the protection against double-spending. ↩︎

  7. Note that when the transaction is accepted into the memory pool, an additional check is made to ensure that the coinbase value does not exceed the transaction fees plus the expected BTC value (25BTC as of this writing). ↩︎

An Empirical Analysis of Traceability in the Monero Blockchain

发表于 2019-04-10 | Edited on 2023-03-05 | 分类于 区块链技术研究

Abstract

This paper empirically evaluate two weakness in Monero’s mixin sampling strategy.

  • About 62% of transaction inputs with one or more mixins are vulnerable to cascade effect so that the real input can be duduced by elimination
  • Monero mixins are sampled in a way that mixins can be easily distinguished form the real input by their age distribution. Since the real input is always the newest input.

The author use the 2th weakness to guess real input with a 80% accuracy over all transactions with one or more mixins.

Besides, the author study the importance of mining pools and the former anonymous marketplace AlphaBay on the transaction volume. After removing mining pool activity, there remains a largte amount of potentially privacy-sensitive transactions that are affected by these weakness.

To improve the anonymity of Monero, the author gives two contermeasures.

  • A new mixins sampling method with two-parameter model (gama distribution)is proposed which can well approximate the user’s ‘spend-time’ distribution.
  • Sampling mixins in ‘bins’, this method regardless of sampling distribution.

Deducible Monero Transactions

A significant number of Monero transactions do not contain any mixins at all, but instead explicityly identify the real TXO being spent. Since users are allowed to create zero-mixins transactions at the begining of Monero. These zero-mixins transaction present a hazard of deanonymization of transactions include them as mixins.

At the time of April 15, 2017, a total of 12158814 transaction inputs have zero mixins.Figure 5 presents the fraction of transactions containing zero-mixin inputs over time.
在这里插入图片描述

implemention

The author extract Monero blackchain up to block 128774(April 15, 2017) and
stored it in a Neo4j graph database (11.5GB of data in total). the algorithm is the same as cascade effect(Amrit Kumar, Clément Fischer, Shruti Tople, and Prateek Saxena. A traceability analysis of Monero’s blockchain. In Simon N. Foley, Dieter Gollmann, and Einar Snekkenes, editors, Computer Security – ESORICS 2017: 22nd European Symposium on Research in Computer Security, Oslo, Norway, September 11-15, 2017, Proceedings, Part II, pages 153–173. Springer International Publishing, 2017.)

Results on Deducible Transactions

Table 2 presents the results, totaly there are about 63% Monero transaction inputs with more than one mixins were deduced.

在这里插入图片描述
Figure 6 show the amount of vulnerable Monero transactions with the number of mixins, and it also shows transaction is less likely to be deducible with more mixins.
在这里插入图片描述

Tracing With Temporal Analysis

Effective-Untracebility

To quantify the untraceability of a transaction input, the authors used guessing entropy to represent the expected number of gusses before guessing the real spent among a inputs. The transaction input’s guessing entropy is defined as

Ge=∑0≤i≤Mi⋅pi\mathrm{Ge}=\sum_{0 \leq i \leq M} i \cdot p_{i} Ge=0≤i≤M∑​i⋅pi​

where Ge is guessing entropy, p=p0,p1,...,pMp = p_0, p_1, . . . , p_Mp=p0​,p1​,...,pM​ are probabilities, sorted highest to lowest, that a referenced output is the real spend of a transaction input.

The authors define effective-untraceability as 1+2Ge1+2Ge1+2Ge. if all referenced outputs of a transaction input are equally likely to be the real sepend, the effective-untraceabilty for that inputs is M+1.

The Guess-Newest Heuristic

The author proposed a heustric that among all the prior outpus referenced by a Monero transaction input, the real spend is usually the newest one. That point view came from the Figure 2.
在这里插入图片描述
The conclusion came from zero-mixin inputs and inputs deduced from zero-mixin inputs. The mixin’s spending time is quite different with the real input.This is because users spend coins soon after receiving them while the mixin’s sampling method do not take account of user’s spending behaviours.

The authors found the 92% of the deducible inputs coule be gussed correctly in that way. The result is in Table 3.
在这里插入图片描述

Countermeasures

  1. Improve the mixin-sampling procedure to match the real spend-time of MOnero users.
  2. introduce a countermeasure called binned mixin sampling which modifies the current mixin sampling procedure.

Estimating the spend-time distribution

Following Figure shows the CDF of Bitcoin blockchain and Monero blockchain.
在这里插入图片描述
The Bitcoin spend-time have a somewhat similar shape with Monero spend-time.The authors use R’s fitdistr function to fit a gama distribution(shape parameter19.28, rate parameter 1.61)

Sampling mixins using the spend-time distribution

using the distribution above to sample mixins to matches the ideal spend-time. The author’s method is:

1. sample a target timestamp directly from the distribution
2. Find the nearest block containing at least one RingCT output.
3. sample uniformly among the transaction outputs in that block

A more detail Algorithm is following
在这里插入图片描述

Monte Carlo Simulation

Following Figure shows the effective untraceability set under the current regime and the author’s proposed mixin sampling routine, the effective-untraceability set has significant increased.method performs slightly worse than ideal at 6 and 12 months out, although still much better than the current method, and stays within 75% of the ideal
在这里插入图片描述

  • Preserve some untraceability even in the face of a highly compromised mixin sampling distribution.

Binned mixin sampling

Group outputs in the Monero blockchain into sets of some fixed size called bins such that ecah output in a bin is confirmed in the same block or a neighboring block as Figure 13.

在这里插入图片描述
Any transaction input referencing a transaction output in a bin, either as a mixin or spend, must also reference all other outputs in that bin. Thus, a real spend cannot be distinguished by age from the other mixin outputs in the bin. Additionally, binned mixin sampling ensures that all the outputs in a bin cannot be deduced as spent until the last unspent output in the bin is spent, preventing deduction attacks from reducing the effectiveuntraceability of an output to less than the bin size.

Sample Algorithm is showed in Algorithm 2.
在这里插入图片描述

Recommendations

  • The mixing sampling distribution should be modified to closer match the real distribution.
  • Avoid including publicly deanonymized transaction outputs as mixins
  • Monero users should be warned that their prior transactions are likely vulnerable to tracing analysis
    The aothor launched a block explorer(https://monerolink.com), which displays the linkages between transactions infered using our techniques, they recommend additionally developing a wallet tool that users can run locally to determine wheter their previous transactions are vulnerable.

Thinking

There is some points in this paper:

  • Since zero-mixins result in a short transaction and spend less fees, so the user choose to choose zero-mixins, but the author ignores if it is because there are not enough same denominations? But the paper [A Traceability Analysis of Monero’s Blockchain] (https://blog.csdn.net/t46414704152abc/article/details/89175204) presents a rigorious analysis.

  • The author said new transactions are immune is not because of the RingCT mechanism itself, rater because RingCTs was deployed after the mandatory 2-mixin was enforced. I came up with a doublt, why? but the author didn’t tell us the analysis support.

  • May be next time, we should analyse the untraceability of RingCTs.

A Traceability Analysis of Monero’s Blockchain

发表于 2019-04-08 | Edited on 2023-03-05 | 分类于 区块链技术研究

Abstract

Monero 以相比于Bitcoin而言更加具有匿名性,在本文中作者使用了3中启发式的方法对Monero 区块链中的交易进行分析,虽然Monero中使用了mix-in方式,实际上其中87%的交易地址仍然是可以被追踪的;再新的Monero版本中采用了RingCTs,但是启发式方法仍然有效。在这些可以被追踪的交易中,其中98%的交易中使用的mix-in地址都是最近新产生的output地址,作者使用了Monero用户的消费习惯并对交易分析,实际分析结果表明Monero中以triangle distribution选择mix-in输入的方法对提升交易追踪难度作用不大。
在对Monero进行分析之前,首先对Monero区块链进行了分析,其中发现如下3个重要信息:

  • 超过65%的交易输出,没有采用mix-in,也就是说这些交易本身是可追踪的。Monero中将可追踪的交易做mix-in,顺藤摸瓜可以追踪其他交易,作者以此65%为基础,顺藤摸瓜追踪到了另外22%的交易地址。
  • 启发式方法二:一些minx-in中使用了某笔交易中的多个输出,这多个输出很有可能来自于同一人。以non-RingCTs的Monero区块链中87%的交易地址验证该启发式方法,真阳率为95%,鉴于此,推断出该方法仍然适用于RingCTs中的地址。
  • 启发式方法三:Monero区块链中的UTXO,存在的时间越久,被花费的概率越大。仍然以non-RingCTs的Monero区块链中87%的交易地址验证该启发式方法,真阳率为98.5%,推断出该方法仍然适用于RingCTs区块链中。

Monero

Monero(XMR) 于2014年4月18日上线,当前出块时间为120秒,使用CryptoNote进行挖矿,每个区块奖励不定,,目前Monero价格为67美元。
Monero提升用户匿名性上,使用了autonomous和spontaneous的协议,在Monero中用户在交易过程中可以自发的进行混币,混币本身并不增加额外的时间延迟。Monero主要解决了两个问题:

  • (1) Unlinkability,对于任意两笔交易,无法证明这两笔交易是转发给同一个人。
  • (2) Untraceability,对于一笔交易中的输入,对应的赎回output应该隐藏在多个output中。

对于Unlinkability,Monero中使用了one-time random address。每次进行交易时,发送方为接收方产生一个一次性的随机接收地址,而只有接收方才能花费接收地址中数字货币。这样的前提是每次产生接收地址时都有一个好的随机源,同时每个接收地址只使用一次。这就是Monero中的 Ring Signature。发送者(也是签名者)代表一组其他用户匿名签署交易(消息)。被赎回的实际输出在属于其他用户的选定输出集合中保持匿名。
2015年~2016年期间,Monero币价涨了将近27倍,到了2017年,Monero又采用了Ring Confidential Transaction(RingCTs)以提升其隐私性(隐藏交易真正的输出地址)。在RingCTs中隐藏了交易额。

Monero System Parameter

Monero中采用了Ed25519 椭圆加密算法,在该加密算法中。Monero中的每个用户都有一个长期的公钥对和私钥对,记为 (pkLTuser,skLTuser)(pk_{ LT }^{ user }, sk_{ LT }^{ user })(pkLTuser​,skLTuser​),其中公钥对是可以公开的,公钥对用于接收转账,私钥对用于发送转账,它们关系如下:

  • skLTuser=(a,b)sk_{ LT }^{ user } = (a, b)skLTuser​=(a,b), 范围是[1, L-1], L是椭圆曲线上某个点G的素数阶。
  • pkLTuser=(A,B)pk_{ LT }^{ user } = (A, B)pkLTuser​=(A,B), 其中A = aG, B= bG,其中G是标准的Ed25519基点。

Ensuring Unlinkability

Monero中发送方用接收方的公钥对随机产生一个一次性地址,然后将XMR发送至这个一次性地址,而只有接收方能够花费一次性地址中的XMR。假定发送方是Alice,接收方是Bob,Alice产生一次性地址的过程如下:

  • 获取Bob的pkLTBob=(A,B)pk_{ LT }^{ Bob } = (A, B)pkLTBob​=(A,B)
  • 随机产生一个r,r∈[1, L-1]
  • 令R = rG, P = hash(rA)G+B
  • Bob的接收地址是P
    由于P = hash(rA)G+B, 根据B的公钥对和私钥对的关系(A = aG, B = bG),同时R =rG,替换P的表达式,得到:
  • P= hash(raG)G+bG = G(hash(aR)+b) = sG
    而Alice转账给Bob的地址,Bob通过自己私钥中的(a, b)和R计算,因此只有Bob知道Alice环形签名中众多地址中真正转账给Bob的地址。在这笔转账中,除了Alice和Bob之外,没有人能知道真正转账给Bob的地址,这保证了Monero中交易的Unlinkability。
    如果需要多个output,可以随机出多个接收转账的地址,每个交易的输出只能被相应的一次性随即地址识别出来。在Monero中,每次转账的输出地址是一次性的公钥,记为pkOTpk_{ OT }pkOT​。对应的私钥记为skOT{ sk_OT }skO​T,它们的关系记为P = sG。

Ensuring Untraceability

Monero中的不可追踪性是通过ring signatures(环形签名)实现的。环形签名使得用户可以在若干名用户形成的环上对消息进行签名。签名的用户只需要知道自己的私钥,签名后用户将其他用户的公钥放到环上。对于矿工或者接收方来说,他们只知道真正的签名者是环中的一员,但是无法确认是哪一个,发送方通过环签名的方法实现匿名。仍然以Alice 发送给Bob10 XMR为例说明环形签名的过程。

  • Bob的pkLTBob=(A,B)pk_{ LT }^{ Bob } = (A, B)pkLTBob​=(A,B),然后随机产生发送地址P_Bob
  • Alice选取Monero链上其他一些价值为10 XMR的output$(P_1,P_2,…))
  • 令S={ \{ P_1,P_2,…P_m\ } },其中包括Alice自己的input Pt=stGP_t = s_t GPt​=st​G
    Alice的input混合在其他价值为10的output中达到匿名的目的,而S称之为匿名集。Alcie使用自己的私钥s_t对消息进行签名。对于矿工和Bob来说,他们无法判断Alice这笔转账的支出来源地址,这就使得这笔转账的input具有了匿名性。S中其他用户的公钥称之为mix-ins,mix-ins越大,匿名性越好。

Resist Double Spending

上述Alice给Bob的转账中,既然无法确定Alice具体转账的input地址,对于矿工来说,无法知道Alice是否会进行double spending。为了解决该问题,Monero中引入了key image(ζ)机制,即Alice的交易中需要提供一个key image,即:

  • ζ=stHashp(Pt)ζ = s_tHash_p (P_t)ζ=st​Hashp​(Pt​)

上述哈希函数中会得到椭圆曲线中一个点,这有区别于Hash函数。key image 是对转账的input的一个可识别的标记,矿工会对每个区块中每笔交易的key image进行记录,Alice进行双花时,矿工检测到生成的key image已经存在就能发现双花攻击。
注意:Monero中具体进行交易检验的细节内容,暂时没有深入的了解,待后续调研。

下图介绍了一个具体的Monero的交易信息,其中有多个输入,每个输入都会添加mix-ins,总共2个input和 3个output,每个input都有1个key image。第一个input使用了2个mix-in,第二个input使用了1个mix-ins。与Bitcoin一样,所有的input交易额之和应该等于所有的output交易额之和。
在这里插入图片描述

RingCTs

2017年1月10日,Monero中上线了一种新的交易类型,称之为ring confidential transaction(RingCTs). 在一个RingCTs中,不仅隐藏了交易的真正input,同时也隐藏了交易额,在RingCTs中,每个output的交易额都标记为0,验证inputs和outputs的交易额相等的方法称之为commitment scheme,这里不再具体涉及。使用RingCTs的好处就是,转账进行mix-ins时,不用找相同价值的output,而是其他任意output都可以作为mix-ins。

Monero Network Statics

Monero区块链提供了Remote Procedure Calls(RPC)的方法,该论文通过RPC获取Monero区块链数据,RPC接口提供两个方法:getheight和getransactions,返回的JSON形式的文本。
该论文分析的Monero区块链,截止时间为2017年1月10日,高度1240503,其中总共961463笔非coinbase交易,总共1339733个output,最大一笔输出为500000 XMR,其中85%的output的金额小于0.01 XMR。Monero区块链中output中XMR的分布图如下。

在这里插入图片描述
在Monero中,规定output金额应该是A×10B的形式,其中1<=A<=9, B>=-12。实际分析发现其中99.98%的output的金额并不符合Monero中output格式,同时其中92.8%的output金额在Monero中是唯一的,这些output总和是12231.27 XMR。Output金额不符合要求,是因为Monero中交易费用会根据交易大小而变化,交易的大小受mix-ins数量的影响,最终导致output值的不符合其规定。

Number of MIx-ins

Min-ins的使用,各个input有所不同,最小的mix-ins是0,最大的mix-ins为851。但是其中[0,4]范围的mix-ins占比96%。不同mix-ins的使用的累积分布图如下:
在这里插入图片描述
这里面作者猜想大部分交易都是用数量较低的mix-ins的原因有两个,一方面有可能找不到足够多的等价值的output作为mix-ins,另外一方面,mix-ins的数量越多,意味着交易越大,交易越大则交易费越高。为了进一步对这两个原因进行分析,作者统计了mix-ins在0~11范围内所有对应交易中可以使用更高数量mix-ins的比例,其结果如Table 2所示,其中最后一列表示相应数量的mix-ins中,可以使用更高mix-ins的交易所占的比例,例如在mix-ins为2的交易总共2908304笔,但是其中2902246笔可以使用大于2的mix-ins,这说明Monero中大量交易使用较低的mix-ins不是因为没有足够的mix-ins,而是为了避免高额的手续费。
在这里插入图片描述

Number of Inputs and Outputs

在Monero区块链中input和output数量的变化情况如图4的统计所示。在Monero上线初期转账的时候,为了将output凑成A×10B的形式,因此会有很多输入和输出。Monero上线第一周,input和output的平均值分别为19和17,到第4周时input达到104,最后1周时下降到3,这是因为RingCTs技术的采用。
在这里插入图片描述
在采用RingCTs后,Monero中的output数量大幅下降,其平均值为2~4,然而input数量的变化却没有固定规律,主要是因为有很多input凑在一起支付的原因。在使用RingCTs后intput和output的情况如图5所示。
在这里插入图片描述

Summary

对Monero区块链的统计分析情况,使用表3进行一个比较全面的总结。
在这里插入图片描述

Traceability Attacking

Heuristic I

前文经过分析,作者发现了在Monero中,有65%的交易没有采用mix-ins技术,这就意味着这些交易中的所有input,都非常明确他们作为output是何时被花费出去的。因此,如果其他交易中使用了这些交易中的input作为mix-ins,那么就可以确定其他交易中真正被花销出去的output是哪一个,在文中作者称之为Cascade Effect,其效果如图6所示。
在这里插入图片描述
作者使用这种分析方法,逐渐减小一些交易中的匿名集合,直到匿名集合数量为1,于是就能确定真正被花销出去的output,最后根据这种方法追踪到了额外22%的交易。作者的追踪算法详细内容如下:
在这里插入图片描述
图7展示了交易追踪算法分别迭代1、3、5次之后追踪到的结果。在Figure 7a中,分别表示在mix-ins为0~10中,迭代1次、3次、5次能够追踪到的交易的比例。Figure 7b表示不同数量的mix-ins,迭代次数分别为1、3、5次时追踪到的交易的比例变化情况;Figure 7c表示随着时间(Week为单位)增长,不同迭代次数追踪到的交易比例,随着Monero中采用了RingCTs技术之后,Heuristic I已经无法追踪其中的inputs。

在这里插入图片描述
即使使用了Heuristic I,仍然有一些交易的input是无法追踪的,论文统计了mix-ins在-~1-范围内的情况,随着mix-ins数量增多,能准确追踪的input数量越来越少,针对mix-ins为10的input,其中24%的交易,其匿名集可以减少为2个input。统计情况如图8所示。

在这里插入图片描述

Heuristic II

Heuristic I的方法针对于没有使用RingCTs技术的Monero区块链分析有用,但是后续使用RingCTs的Monero区块链无能为力,于是作者使用了启发式方法II,该方法假设如果在交易Tx-a中,有2个input,其中一个input作为mix-ins,同时有2个输出O1和O2;如果在另外一笔交易Tx-b中,如果同时使用O1和O2作为input,那么则认为O1和O2隶属于同一个人;启发式方法2认为一笔交易中的inputs全部来自之前一笔交易的output的概率很低,如果出现这种情况,则认为这些input都会在这笔交易中被花出去。为了方便叙述,将Tx-a称之为source transaction,将Tx-b称之为 dest transaction,dest transaction的input中至少使用了source transaction中不少于2个的output。作者的假设可以参见图9。

在这里插入图片描述
由于启发式方法2是基于假设,因此基于假设的结果未必会有结论,同时还会又一些错误,论文作者也承认这一点,但是还是基于此不太靠谱的假设强行展开了分析并设计了算法,求解Monero使用RingCTs后的交易中是否存在一些dest transaction 使用了至少2个其他交易中的output,算法如下:

在这里插入图片描述
Algorithm 2 的运行情况有4种:

在这里插入图片描述
注意:我对这里面S2和S3的分类没有很明白有什么区别?找到several dest trx不是表明有给定的source,其output出现在多个dest 的input中吗?这和S3不就是一个意思吗?

其中S1说明方法没有奏效,S2说明方法在transaction level中存在false positive;S3情况说明方法在input level 存在false positive;S4才是真正说明source 的outputs在dest中确实被花费了。
为了评价方法的效果,分别统计4种情况出现的比例,同时以Heuristic I中获得的87%的数据作为真实数据,应用Heuristic II方法。首先经过统计总共找到410237种source trx,这些占比所有trx的43%, 其中包括636 笔包含RingCTs的trx,这只占RingCTs交易数的1%。将Heuristic II方法应用到不包含RingCTs的409601笔 trx中,其中60%的source trx 有1个对应的dest trx,其中1笔source trx能找到的dest trx的最大数目为146,对一个给定的dest trx,寻找对应的dest trx,dest trx数量增多,对应的source trx的比例逐步下降,如图Figure 10a所示。
在这里插入图片描述

Figure 10b中是将Heuristic II 的方法应用到 636笔RingCTs trx中,发现其中95.1%的source trx 仅仅对应1个dest trx。Figure 10c表示对应于non-RingCTs的交易,Heuristic II方法验证中,TP占有87.3%,而对于用户来说,Monero区块链采用RingCTs前后消费习惯没有多大变化,因此Heuristic II在RingCTs中的分析TP应该也占大部分的比例。

在这里插入图片描述

为了进一步说明在non-RingCTs中的结果比较可信,作者按照mix-ins的数量变化对Heuristic II方法的结果进行了统计,结果如图11所示,因为mix-ins数量增加,Heuristic I中可以追踪的交易数量大幅下降,因此针对Heuristic II中的结果,有一大部分是无法检测结果的正确性,但是即使如此,其中明确的False Positive几乎为0。

Heuristic III

启发式方法3的中,作者认为一个UTXO,随着时间的增长,其被花费的概率会越来越大,因此作者认为,在一个环形签名的公钥中,真正的转账地址应该是所在区块高度最高的那个地址(听起来有几分道理,如果有几个地址高度相同呢?),作者抱着试一试的想法,将这个启发式方法应用到non-RingCTs中的交易中,发现作者的方法,精确率能达到98.1%(看起来虽然是个扯淡的猜想,但是居然make sense!)为了规避这个问题,Monero developer在2015年4月5号将原本的mix-ins采样算法从正态分布换成了triangle distribution,这种采样中,对一个input,会挑选最近的output作为其mix-ins以解决这个问题。为了验证这种Monero developer采用的新的采样方式的效果,作者对2015年4月5号以后的交易进行了Heuristic III的分析,与之前的正态分布的采样下的结果比对,结果如表5所示,表5的情况说明采用新的采样方法之后,对于Heuristic III方法的影响不大。

在这里插入图片描述

为了对Heuristic III的方法的假设进行进一步的验证,对Heuristic I中确定的87%的交易进行了统计,分别统计这些UTXO在输出之后分别在什么时候被花销出去,作者对用户消费习惯进行如下分类,其中占比分别为:

  • 在[0,9]个区块内被花费的UTXO占比0.17%
  • 在[10,100]范围内被花费的UTXO占比9.16%
  • 在[101, 1000]范围内被花费的UTXo占比28.4%
  • [1000, +∞]范围内被花费的UTXO占比62.27%

据此,分别计算得到一个概率密度图,如图12所示,作者建议依据此概率选择mix-ins更加合理。

在这里插入图片描述

Releated Work && Conclusion

本文的工作基于Menero Lab的两篇公开的文献MRL-001和MRL-002MRL-004。其中Heuristic I来自于MRL-001。本文的Heuristic II和Heuristic III分别来自于Monero-004。
本文最重要的贡献在于利用Heuristic I方法能够追踪到Monero 区块链中87%的交易,同时对于Monero Lab中对Monero做的一些改进进行了验证,Heuristic II和Heuristic III分别指出了改进方法的不足,同时给出建议,Monero Developer在进行mix-ins采样时可以考虑用户花费UTXO的习惯以提升匿名性。

Thinking

  • 相比于ZCash这篇论文,这篇文章中的作者为什么不在Monero中自己注册多个账号,然后多次进行转账,如果RingCTs中某个用户也恰恰使用1个mix-ins并且选中了作者的账号,那么就可以同样适用Heuristic I的方法,我就后续进行一些调研以验证我的想法,如果可以的话,就可以根据这篇文章的不足继续推进一些分析工作,例如可以分析Monero在采用了RingCTs技术之后匿名性/可追踪行到底如何?
  • 本文的工作就量和质上与ZCash的那篇文章确有不及,这方面也令我看出发表一篇顶会,不仅需要原创、有效并且非常合理的想法,而且也需要有相当数量的分析工作,两者兼具,才能发到A类会议中。
  • 对于RingCTs的使用方法、以及Monero中是如何防止双花的细节,我比较好奇,后续会进行一些调研。

New Empirical Traceability Analysis of CryptoNote-Style Blockchains

发表于 2019-04-08 | Edited on 2023-03-05 | 分类于 区块链技术研究

发表于Financial Cryptography and Data Security 2019的一篇文章。
文章链接:http://fc19.ifca.ai/preproceedings/69-preproceedings.pdf

摘要

在(PETS’18)会议提出对Monero 不可追踪性的cascade effect 攻击已被开发者使用两个方法规避,其中之一是增加币环形签名(Ring Signature)中mix-ins的个数,从 0.9.0版本中的3个增加到了0.12.0版本中的7个,同时增加了ring confidential transactions(ringCTs)以提升隐私性。然而,目前并没有人对Monero当前应对的策略的匿名性进行分析。 改论文提出一种统计学分析,对所有CryptoNote类型的加密货币进行closed set attack.随后对Monero、Bytecoin以及DigitalNOte进行这种攻击,实验表明,结合了cascade attack之后的closed set attack能够识别出Monero中70.52%的input、Bytecoin中74.25%的inputs以及DigitalNote中91.56%的input。
随后对该种攻击成功的概率进行理论分析,发现成功概率为 2^19,closed set attack近似于statiscal attacks,据此,文中分析认为Monero当前的系统设置可以抵御statiscal attacks,另外文章分析说明了mix-ins不是越大越好,而是其中未被花费的input比例越高越好。

Intruductioon

目前加密货币中用户的匿名性和隐私性都逐渐受到重视,因此出现了很多致力于保护用户隐私的加密货币,例如Monero、Bytecoin、Dash、DigitalNote、Boolberry等货币,这些货币都使用了CryptoNote 协议。在这些货币中,使用了ring signature(环形签名)技术,即在一笔交易的输入中,支付方会将自己的input地址和区块链中其他output地址混合起来形成一个环,这样做的目的是不让外界知道真正的input具体是哪一个,其他没有被花费的input称之为mix-ins。

然而实际上Monero区块链中有65%的用户在花销的时候,使用的mix-ins为0,而这些交易很容易被确定真正的input,随后其他一些用户使用了这些被追踪的input作为mix-ins之后也面临着被追踪的危险,也确实有文章进行了相关分析,经过分析后发现其中87%的input都能被追踪到。随后Monero开发团队也对其进行了升级,其中引入了RingCTs技术,RingCTs技术中即使是不同数目的输入也可以作为mix-ins,同时将mix-ins的数量从2提升到了6(2019年3月29日的0.12.0版本)。但是实际上这些货币匿名性如何呢?

本文中作者引入了closed set attack方式,简而言之就是如果有X个inputs的集合,其中恰好又有X个不同的地址,那么说明在这X个inputs中,不同的X个地址都已经被花销出去,因为每个inputs至少要消费一个地址。假若其他inputs中包含了这X中的地址,那么其他inputs的匿名集就可以减小,如果减小到1,就能够追踪到其中的交易。

Preliminary

CryptoNote protocol

CryptoNote协议致力于做两件事情:

  • Untraceability: 对于任何交易,真正被花费的地址应该是在一系列outputs中匿名的作为inputs
  • Unlinkability: 对于任意两个交易,不可能证明这两笔交易是发送给同一个用户的。

为了实现unlinkability,CryptoNote中每次转账时使用一个一次性地址,而这个一次性地址来源于接受者的公钥和发送者生成的一个随机数。 为了实现untraceability,CryptoNote中使用了环形签名。

Closed Set Attack

为了说明攻击方法,用txi.in表示每笔交易的输入,假设当前有4笔交易,每笔交易中的inputs分别是:

  • tx1.in = { pk1, pk2, pk3 }
  • tx2.in = { pk2, pk3 }
  • tx3.in = { pk1, pk3 }
  • tx4.in = { pk1, pk2, pk3, pk4 }
    其中pk表示public key, 即公钥。在tx1、tx2以及tx3中分别用到了pk1、pk2和pk3,而每个tx中都会花费一个pk,因此前3个交易必然是吧pk1、pk2和pk3已经花费掉了,在tx4中,很明显可以推出pk4是真正的花费地址。
    应用理论分析应该是,在一系列交易中,所有的inputs的数量之和恰好等于这些inputs中不同地址的数目,那么其他应用这些不同地址作为mix-ins的交易,其匿名集中可以除去这些地址以减少其匿名集,如果匿名集和数量为1,那么这笔交易就成为可追踪交易了。

Definition of Cluster

那么这种攻击是如何进行的呢?文中定义一个Clus记为一个inputs的集合,Clus = { R1, R2,…, Rn },每一个Clusetr中所有不同地址的集合,称之为PK_Clus,一个inputs我们使用R代表。假设已经存在一个Clus,那么一个inputs和Clus之间的差集定义为

  • Dist(R, Clus) = Dist(R, PK_Clus) = |R| - |PK_Clus∩R|
    举例说明之,假设Clus = { { pk1, pk2 } , { pk1, pk3 }, { pk2, pk4 } }, 那么PK_Clus = { pk1, pk2, pk3, pk4 },假设某个R = { pk1, pk3, pk5 }, 那么Dist(R, Clus) = 3-2 =1.

closed set Attack Algorithm

为了进行closed set Attack,文中使用了一种聚类的方法,这种聚类的方法由两个算法构成,其中第二个算法调用了第1个算法。算法首先对所有的inputs应用Cascade-Effect攻击以减少其匿名集,随后对剩余的inputs集合输入到算法2中,Algorithm 2如下:

1
2
3
4
5
6
7
8
9
10
11
12
1: Let DataSet be all transaction inputs in the blockchain.
1. Cascade-Effect(Dataset)
2. Flag = true
3. while Flag == true do
4. Flag = false
5. for each R ∈ DataSet do
6. Clus_Form(R) -> Clus // 调用了Algorithm 1
7. if Clus is a closed set then
8. Remove(Clus) ->Flag // 删除Dataset中的Clus集合
9. if Flag == true then
10. find traceable inputs
11. check whether rings inside Clus are traceable

Algorithm 1算法如下:

1
2
3
4
5
6
1.  Start with an input R, and define the cluster as Clus = { R }
2. Let DataSet be all transaction inputs in the blockchain
3. for each R1(≠ R) 2 DataSet do
4. if Dist(R1, Clus) ≤ 1 then
5. Clus = Clus ∪ { R1 }
6. return Clus

对于Dataset中的所有inputs,迭代使用Algorithm 2,假设所有inputs个数为N,而每个R的长度为L,那么总的算法复杂度为θ(LN²) 。

Experiment

Dataset

本文收集了从Monero区块链创世块(2014年4月18日)到2018年3月30日的区块,总共1541236个区块,工2612070笔非coinbase 交易。

Experiment Result

将本文方法应用于Monero区块链分析,首先应用Cascade effect attack,发现其中16334967笔交易可追踪,而closed set总工追踪到了5752笔交易,因此总共追踪到70.52%的inputs。追踪结果如下表所示。总共找到3017个closed set,大小从2到55不等,总共包含了7478个public_keys,这些public keys已经被花销了,如果其他输入使用这些inputs作为mix-ins,那么是无效的。

mix-insg个数 inputs数 共可追踪inputs数 Cascade Effect Closed set 百分比
0 12209675 12209675 12209675 0 100
1 707786 625641 625264 377 88.39
2 4496490 1779134 1776192 2942 39.57
3 1486593 952855 951984 871 64.10
4 3242625 451959 451230 729 13.94
5 319352 74186 73980 206 23.23
6 432875 202360 202100 260 46.75
7 21528 4296 4282 14 19.96
8 30067 3506 3490 16 11.66
9 17724 2178 2162 16 12.29
Total ≥10 200030 29177 28856 321

最后还剩余6829778笔inputs仍然不可追踪,但是这些交易的匿名集已经大大减少,减少情况如下图所示。可以看到,很多之前inputs中地址很多,但是经过closed set分析之后币有多都可以识别,其中inputs你们集合是1的,当下有超过100万,想办法进一步进行分析,或许可以有更多收获。不过作者并没有进一步分析。

在这里插入图片描述

此外,作者分别对Bytecoin和DigitalNote进行了同样的分析,分析的结果没有过多需要介绍的,因此这里略过。

Observations and Recommendations

  • Obervation 1: 区块链中outputs的使用率是匿名性中一个非常重要的因素,因为每个outputs毕竟只能被redeem 1次,因此低的使用量能提升匿名性。
  • Obervation 2: Closed sets与intpus的匿名性息息相关,找到Closed sets有助于减少匿名集和找到real spent,虽然其数量不多,但是仍然会威胁到匿名集。
  • Recommendation 1: 为了减少outputs的使用率,应该增加更多的outputs,建议用户增加一些价值为0 的输出。(PS:输出越多,花费的交易费越多,用户愿意吗?)
  • Recommendation 2: 不用使用无效的mix-ins。PS:如果用户知道的话,用户当然不会使用了。

Thinking

这篇文章就提出了1种攻击方式,相比于其他文章来说,在内容和分析展示情况上都显示出比较单一,个人觉得提出的方法很好,但是并没有很好地挖掘这种方法之后的结果,这种方法已经将匿名集降低到1了,此时如果在坚持一下,或者在想想别的分析方法,那么就不是简单的发表在FC上了,可以冲击一下B类会议。

EOS中plugin之net_plugin

发表于 2019-03-28 | Edited on 2023-03-05 | 分类于 区块链技术研究

这部分重点介绍EOS中的服务器端部分nodeos启动之后开启的另外一个重要的插件——net_plugin,这个插件主要负责服务器在网络中的接入、同步区块信息、断开等功能。对于这个插件,首先从其类的定义开始了解。

1
2
3
4
5
6
7
8
9
10
11
12
13
14
15
16
17
18
19
20
21
22
23
24
class net_plugin : public appbase::plugin<net_plugin>
{
public:
net_plugin();
virtual ~net_plugin();

APPBASE_PLUGIN_REQUIRES((chain_plugin)) // net_plugin这个插件的启动,依赖chain_plugin插件
virtual void set_program_options(options_description& cli, options_description& cfg) override;

void plugin_initialize(const variables_map& options); // 插件初始化
void plugin_startup(); // 插件的启动
void plugin_shutdown(); // 插件关闭

void broadcast_block(const chain::signed_block &sb); // 广播区块

string connect( const string& endpoint ); // 连接其他端点
string disconnect( const string& endpoint ); // 断开连接
optional<connection_status> status( const string& endpoint )const; // 查看与某个端点的链接状态
vector<connection_status> connections()const; // 查看连接状态

size_t num_peers() const; // 查看建立连接的端点个数
private:
std::unique_ptr<class net_plugin_impl> my; // 和producer_plugin_imple一样,这个插件负责网络中的具体操作
};

net_plugin插件的代码还是比较容易理解的,net_plugin的初始化函数非常简单,代码如下:

1
2
3
4
net_plugin::net_plugin()
:my( new net_plugin_impl ) {
my_impl = my.get();
}

初始化函数中生成了一阁net_plugin_impl的实例,随后将my的指针赋值给了net_plugin_impl类中的定义的静态指针,这个静态指针的定义如下:

1
static net_plugin_impl *my_impl;

再nodeos的main函数中,net_plugin首先会初始化,随后调用其plugin_initialize函数和EOS中lugin之producer_plugin的介绍的procuder_plugin类初始化方式时一样的,先寻找这个插件依赖的插件,然后初始化依赖的插件、一些启动参数,设置心跳计时器等。

nodeos中初始化完毕,随后调用net_plugin的plugin_startup函数,该函数代码如下:

1
2
3
4
5
6
7
8
9
10
11
12
13
14
15
16
17
18
19
20
21
22
23
24
25
26
27
28
29
30
31
32
33
34
35
36
37
38
39
void net_plugin::plugin_startup() {
my->producer_plug = app().find_plugin<producer_plugin>();
if( my->acceptor ) {
// 常见的网络服务操作,打开监听服务,设置选项,绑定地址,启动监听
my->acceptor->open(my->listen_endpoint.protocol());
my->acceptor->set_option(tcp::acceptor::reuse_address(true));
try {
// acceptor 来自于boost::asio::ip::tcp,即tcp::acceptor
my->acceptor->bind(my->listen_endpoint);
} catch (const std::exception& e) {
ilog("net_plugin::plugin_startup failed to bind to port ${port}",
("port", my->listen_endpoint.port()));
throw e;
}
my->acceptor->listen();
ilog("starting listener, max clients is ${mc}",("mc",my->max_client_count));
my->start_listen_loop(); // 循环监听函数
}
chain::controller&cc = my->chain_plug->chain();
{
cc.accepted_block.connect( boost::bind(&net_plugin_impl::accepted_block, my.get(), _1));
}

my->incoming_transaction_ack_subscription = app().get_channel<channels::transaction_ack>().subscribe(boost::bind(&net_plugin_impl::transaction_ack, my.get(), _1));

if( cc.get_read_mode() == chain::db_read_mode::READ_ONLY ) {
my->max_nodes_per_host = 0;
ilog( "node in read-only mode setting max_nodes_per_host to 0 to prevent connections" );
}
// 启动连接和交易到期的监视
my->start_monitors();

for( auto seed_node : my->supplied_peers ) {
connect( seed_node );// 连接种子节点,接入p2p网络
}

if(fc::get_logger_map().find(logger_name) != fc::get_logger_map().end())
logger = fc::get_logger_map()[logger_name];
}

首先打开监听的端口号,设置相关协议,随后绑定端口号,然后开始监听网络中的信息,同时让本端点连接到网络中的种子节点,以此连接EOS中的p2p网络。这里面最重要的2个函数是 my->start_listen_loop()以及my->start_monitors()函数,my->start_listen_loop,通过函数名称可以断定主要用来不断地从网络中监听网络中发送的信息,my->start_monitors()应该是进行监听,但是到底监听什么,我们还不得而知。

这里暂时先不对net_plugin_impl进行具体解析,因为这并不影响我们对这两个函数的分析,另外一方面,net_plugin_impl的介绍对于这两个函数的分析,帮助不大。
因此,我们直接进入start_listen_loop函数一探究竟。

1
2
3
4
5
6
7
8
9
10
11
12
13
14
15
16
17
18
19
20
21
22
23
24
25
26
27
28
29
30
31
32
33
34
35
36
37
38
39
40
41
42
43
44
45
46
47
48
49
50
51
52
53
54
55
56
57
58
59
60
61
62
63
64
/// 该函数循环监听信息
void net_plugin_impl::start_listen_loop() {
auto socket = std::make_shared<tcp::socket>( std::ref( app().get_io_service() ) );
acceptor->async_accept( *socket, [socket,this]( boost::system::error_code ec ) {
if( !ec ) {
uint32_t visitors = 0;
uint32_t from_addr = 0;
auto paddr = socket->remote_endpoint(ec).address();
if (ec) {
fc_elog(logger,"Error getting remote endpoint: ${m}",("m", ec.message()));
}
else {
for (auto &conn : connections) {
if(conn->socket->is_open()) {
if (conn->peer_addr.empty()) {
visitors++;
boost::system::error_code ec;
if (paddr == conn->socket->remote_endpoint(ec).address()) {
from_addr++;
}
}
}
}
if (num_clients != visitors) {
ilog("checking max client, visitors = ${v} num clients ${n}",("v",visitors)("n",num_clients));
num_clients = visitors;
}
if( from_addr < max_nodes_per_host && (max_client_count == 0 || num_clients < max_client_count )) {
++num_clients;
connection_ptr c = std::make_shared<connection>( socket );
connections.insert( c );
start_session( c );

}
else {
if (from_addr >= max_nodes_per_host) {
fc_elog(logger, "Number of connections (${n}) from ${ra} exceeds limit",
("n", from_addr+1)("ra",paddr.to_string()));
}
else {
fc_elog(logger, "Error max_client_count ${m} exceeded",
( "m", max_client_count) );
}
socket->close();
}
}
} else {
elog( "Error accepting connection: ${m}",( "m", ec.message() ) );
// For the listed error codes below, recall start_listen_loop()
switch (ec.value()) {
case ECONNABORTED:
case EMFILE:
case ENFILE:
case ENOBUFS:
case ENOMEM:
case EPROTO:
break;
default:
return;
}
}
start_listen_loop();
});
}

start_listen_loop()函数中最重要的一个函数是,监听到消息之后的start_session()函数,表示监听到了新的链接,于是开始会话。start_session()函数内容如下所示。

1
2
3
4
5
6
7
8
9
10
11
12
13
14
15
16
17
18
19
20
21
22
bool net_plugin_impl::start_session(const connection_ptr& con) {
boost::asio::ip::tcp::no_delay nodelay( true );
boost::system::error_code ec;
con->socket->set_option( nodelay, ec );
if (ec) {
// 如果接受数据出错, 直接关闭连接,写日志
elog( "connection failed to ${peer}: ${error}",
( "peer", con->peer_name())("error",ec.message()));
con->connecting = false;
close(con);
return false;
}
else {
// 读取数据,已经开启的session+1
start_read_message( con );
++started_sessions;
return true;
// for now, we can just use the application main loop.
// con->readloop_complete = bf::async( [=](){ read_loop( con ); } );
// con->writeloop_complete = bf::async( [=](){ write_loop con ); } );
}
}

其中重要的是start_read_message,即回话过程中读取数据,即start_read_message()函数,其具体内容如下所示。

1
2
3
4
5
6
7
8
9
10
11
12
13
14
15
16
17
18
19
20
21
22
23
24
25
26
27
28
29
30
31
32
33
34
35
36
37
38
39
40
41
42
43
44
45
46
47
48
49
50
51
52
53
54
55
56
57
58
59
60
61
62
63
64
65
66
67
68
69
70
71
72
73
74
75
76
77
78
79
80
81
82
83
84
85
86
87
88
89
90
91
92
93
94
95
96
97
98
99
100
101
102
103
104
105
106
107
108
109
110
111
112
113
114
115
116
117
118
119
120
121
void net_plugin_impl::start_read_message(const connection_ptr& conn) {
try {
if(!conn->socket) {
return;
}
connection_wptr weak_conn = conn;

std::size_t minimum_read = conn->outstanding_read_bytes ? *conn->outstanding_read_bytes : message_header_size;

// 默认为false,在plugin_initialized中使用
if (use_socket_read_watermark) {
const size_t max_socket_read_watermark = 4096;
std::size_t socket_read_watermark = std::min<std::size_t>(minimum_read, max_socket_read_watermark);
boost::asio::socket_base::receive_low_watermark read_watermark_opt(socket_read_watermark);
conn->socket->set_option(read_watermark_opt);
}

auto completion_handler = [minimum_read](boost::system::error_code ec, std::size_t bytes_transferred) -> std::size_t {
if (ec || bytes_transferred >= minimum_read ) {
return 0;
} else {
return minimum_read - bytes_transferred;
}
};

// 从stream中异步读取固定大小的数据
/* async_read(AsyncReadStream &S, const MutableBufferSequence& buffers, ReadHandler&& handler, )
从*conn->socket中读取data,读到buffers中去,buffers的大小告诉系统读取多少
handler是读取数据完毕之后调用的函数 */
boost::asio::async_read(*conn->socket,
conn->pending_message_buffer.get_buffer_sequence_for_boost_async_read(),
completion_handler,
[this,weak_conn]( boost::system::error_code ec, std::size_t bytes_transferred ) {
auto conn = weak_conn.lock();
if (!conn) {
return;
}

conn->outstanding_read_bytes.reset();

try {
if( !ec ) {
if (bytes_transferred > conn->pending_message_buffer.bytes_to_write()) {
elog("async_read_some callback: bytes_transfered = ${bt}, buffer.bytes_to_write = ${btw}",
("bt",bytes_transferred)("btw",conn->pending_message_buffer.bytes_to_write()));
}
EOS_ASSERT(bytes_transferred <= conn->pending_message_buffer.bytes_to_write(), plugin_exception, "");
conn->pending_message_buffer.advance_write_ptr(bytes_transferred);
while (conn->pending_message_buffer.bytes_to_read() > 0) {
uint32_t bytes_in_buffer = conn->pending_message_buffer.bytes_to_read();

if (bytes_in_buffer < message_header_size) {
conn->outstanding_read_bytes.emplace(message_header_size - bytes_in_buffer);
break;
} else {
uint32_t message_length;
auto index = conn->pending_message_buffer.read_index();
conn->pending_message_buffer.peek(&message_length, sizeof(message_length), index);
if(message_length > def_send_buffer_size*2 || message_length == 0) {
boost::system::error_code ec;
elog("incoming message length unexpected (${i}), from ${p}",
("i", message_length)("p",boost::lexical_cast<std::string>(conn->socket->remote_endpoint(ec))));
close(conn);
return;
}

auto total_message_bytes = message_length + message_header_size;

if (bytes_in_buffer >= total_message_bytes) {
conn->pending_message_buffer.advance_read_ptr(message_header_size);
// 这一部分是网络通信的内容,对于其中细节不甚了解
// 接收的数据传递到pending_message_buffer中,
// process_next_message中进行处理从pending_message_buffer中处理数据
if (!conn->process_next_message(*this, message_length)) {
return;
}
} else {
auto outstanding_message_bytes = total_message_bytes - bytes_in_buffer;
auto available_buffer_bytes = conn->pending_message_buffer.bytes_to_write();
if (outstanding_message_bytes > available_buffer_bytes) {
conn->pending_message_buffer.add_space( outstanding_message_bytes - available_buffer_bytes );
}

conn->outstanding_read_bytes.emplace(outstanding_message_bytes);
break;
}
}
}
start_read_message(conn);
} else {
auto pname = conn->peer_name();
if (ec.value() != boost::asio::error::eof) {
elog( "Error reading message from ${p}: ${m}",("p",pname)( "m", ec.message() ) );
} else {
ilog( "Peer ${p} closed connection",("p",pname) );
}
close( conn );
}
}
catch(const std::exception &ex) {
string pname = conn ? conn->peer_name() : "no connection name";
elog("Exception in handling read data from ${p} ${s}",("p",pname)("s",ex.what()));
close( conn );
}
catch(const fc::exception &ex) {
string pname = conn ? conn->peer_name() : "no connection name";
elog("Exception in handling read data ${s}", ("p",pname)("s",ex.to_string()));
close( conn );
}
catch (...) {
string pname = conn ? conn->peer_name() : "no connection name";
elog( "Undefined exception hanlding the read data from connection ${p}",( "p",pname));
close( conn );
}
} );
} catch (...) {
string pname = conn ? conn->peer_name() : "no connection name";
elog( "Undefined exception handling reading ${p}",("p",pname) );
close( conn );
}
}

抛去其中try catch语句,我们重点看到conn->process_next_message函数,这个函数正如注释所说,从接受到的pending_message_buffer中处理数据,我们继续追踪这个处理函数,如下所示。

1
2
3
4
5
6
7
8
9
10
11
12
13
14
15
16
17
18
19
20
21
22
23
24
// 该函数用于数据同步,使用中心消息处理系统处理数据
bool connection::process_next_message(net_plugin_impl& impl, uint32_t message_length) {
try {
auto ds = pending_message_buffer.create_datastream();
net_message msg;
fc::raw::unpack(ds, msg); // 将解压的ds信息放入msg中
msg_handler m(impl, shared_from_this() );
// 判断msg的类型,msg可以是带签名的区块或者打包后的交易
// 如果是区块,获取signed_block后放入m中
// 如果是trx,则获取packed_trx后放入m中
if( msg.contains<signed_block>() ) {
m( std::move( msg.get<signed_block>() ) );
} else if( msg.contains<packed_transaction>() ) {
m( std::move( msg.get<packed_transaction>() ) );
} else {
msg.visit( m );
}
} catch( const fc::exception& e ) {
edump((e.to_detail_string() ));
impl.close( shared_from_this() );
return false;
}
return true;
}

其中重要的是msg_handler类型,这里面分别针对消息不同的类型做不同的处理,首先查看针对如果msg中包含了signed_block,则进入处理block函数;如果msg中包含packed_transaction,则进入处理trx的函数。首先查看msg_handler是如何处理signed_block的,处理区块的函数如下。收到区块之后验证区块,验证通过则接受区块,验证失败则拒绝区块。

1
2
3
4
5
6
7
8
9
10
11
12
13
14
15
16
17
18
19
20
21
22
23
24
25
26
27
28
29
30
31
32
33
34
35
36
37
38
39
40
41
42
43
44
45
46
47
48
49
50
51
52
53
54
55
56
57
58
59
60
61
62
63
64
65
66
67
68
69
// 如果从网络中收到一个区块,执行相应的处理
void net_plugin_impl::handle_message(const connection_ptr& c, const signed_block_ptr& msg) {
controller &cc = chain_plug->chain();
block_id_type blk_id = msg->id();
uint32_t blk_num = msg->block_num();
fc_dlog(logger, "canceling wait on ${p}", ("p",c->peer_name()));
c->cancel_wait();
try {
if( cc.fetch_block_by_id(blk_id)) {
// recv_block函数具体含义为止,同步区块数据?不应该是检查在先?
sync_master->recv_block(c, blk_id, blk_num);
return;
}
} catch( ...) {
// should this even be caught?
elog("Caught an unknown exception trying to recall blockID");
}

dispatcher->recv_block(c, blk_id, blk_num); // 进行报告,我已经从连接c收到一个编号blk_id和blk_num的区块?
fc::microseconds age( fc::time_point::now() - msg->timestamp);
peer_ilog(c, "received signed_block : #${n} block age in secs = ${age}",
("n",blk_num)("age",age.to_seconds()));

go_away_reason reason = fatal_other;
try {
// 在chain_plug中再检查其具体含义,看catch中的内容,应该是使用chain_plug对区块进行检查
// 如果检查无错误,reason的值应该是no_reason
chain_plug->accept_block(msg); //, sync_master->is_active(c));
reason = no_reason;
} catch( const unlinkable_block_exception &ex) {
peer_elog(c, "bad signed_block : ${m}", ("m",ex.what()));
reason = unlinkable;
} catch( const block_validate_exception &ex) {
peer_elog(c, "bad signed_block : ${m}", ("m",ex.what()));
elog( "block_validate_exception accept block #${n} syncing from ${p}",("n",blk_num)("p",c->peer_name()));
reason = validation;
} catch( const assert_exception &ex) {
peer_elog(c, "bad signed_block : ${m}", ("m",ex.what()));
elog( "unable to accept block on assert exception ${n} from ${p}",("n",ex.to_string())("p",c->peer_name()));
} catch( const fc::exception &ex) {
peer_elog(c, "bad signed_block : ${m}", ("m",ex.what()));
elog( "accept_block threw a non-assert exception ${x} from ${p}",( "x",ex.to_string())("p",c->peer_name()));
reason = no_reason;
} catch( ...) {
peer_elog(c, "bad signed_block : unknown exception");
elog( "handle sync block caught something else from ${p}",("num",blk_num)("p",c->peer_name()));
}

update_block_num ubn(blk_num);
if( reason == no_reason ) {
for (const auto &recpt : msg->transactions) {
auto id = (recpt.trx.which() == 0) ? recpt.trx.get<transaction_id_type>() : recpt.trx.get<packed_transaction>().id();
auto ltx = local_txns.get<by_id>().find(id);
if( ltx != local_txns.end()) {
local_txns.modify( ltx, ubn );
}
auto ctx = c->trx_state.get<by_id>().find(id);
if( ctx != c->trx_state.end()) {
c->trx_state.modify( ctx, ubn );
}
}
// 这里再次进行recv_block,不明白其含义
sync_master->recv_block(c, blk_id, blk_num);
}
else {
// 验证区块过程中出现错误,直接拒绝这个区块
sync_master->rejected_block(c, blk_num);
}
}

对交易的验证与对区块的处理方式相同,验证交易,如果本地存在此交易,则丢弃,否则开始验证交易,若验证通过则接受交易并广播交易,否则拒绝交易。

1
2
3
4
5
6
7
8
9
10
11
12
13
14
15
16
17
18
19
20
21
22
23
24
25
26
27
28
29
30
31
32
33
34
35
36
37
38
39
40
41
42
void net_plugin_impl::handle_message(const connection_ptr& c, const packed_transaction_ptr& trx) {
fc_dlog(logger, "got a packed transaction, cancel wait");
peer_ilog(c, "received packed_transaction");
controller& cc = my_impl->chain_plug->chain();
if( cc.get_read_mode() == eosio::db_read_mode::READ_ONLY ) {
fc_dlog(logger, "got a txn in read-only mode - dropping");
return;
}
if( sync_master->is_active(c) ) {
fc_dlog(logger, "got a txn during sync - dropping");
return;
}

auto ptrx = std::make_shared<transaction_metadata>( trx );
const auto& tid = ptrx->id;

c->cancel_wait();
if(local_txns.get<by_id>().find(tid) != local_txns.end()) {
fc_dlog(logger, "got a duplicate transaction - dropping");
return;
}
dispatcher->recv_transaction(c, tid);
// 验证交易
chain_plug->accept_transaction(ptrx, [c, this, ptrx](const static_variant<fc::exception_ptr, transaction_trace_ptr>& result) {
if (result.contains<fc::exception_ptr>()) {
peer_dlog(c, "bad packed_transaction : ${m}", ("m",result.get<fc::exception_ptr>()->what()));
} else {
auto trace = result.get<transaction_trace_ptr>();
if (!trace->except) {
fc_dlog(logger, "chain accepted transaction");
// 广播交易
this->dispatcher->bcast_transaction(ptrx);
return;
}

peer_elog(c, "bad packed_transaction : ${m}", ("m",trace->except->what()));
}
// 拒绝交易
dispatcher->rejected_transaction(ptrx->id);
});
}

至此,net_plugin以及net_plugin_impl插件中的比较重要的函数已经分析完毕,由于其中细节错综复杂,因此在分析过程中抓住主要脉络进行分析,对于其他细节内容并没有深究。

EOS中plugin之producer_plugin

发表于 2019-03-20 | Edited on 2023-03-05 | 分类于 区块链技术研究

EOS中plugin之producer_plugin

EOS中的插件是非常重要的工具,其中大大小小总共有26个插件,其中比较重要的插件有chain_plugin、producer_plugin、http_plugin、net_plugin等四个插件。这四个插件在EOS服务器端启动后也开始启动进行工作。

abstract_plugin

EOS中所有插件继承于plugin类,而plugin类又继承于abstract_plugin类。
abstract_plugin中规定了每个插件的4个状态,这4个状态依次如下。

  • registered,表示插件已经注册, 每个插件初始化后就是注册的状态。
  • initialized,表示插件已经初始化,插件之后注册之后才能初始化。
  • started, 表示插件正在运行中。
  • stopped,表示插件停止运行。

下面是abstract_plugin的源代码,由于是个抽象类,abstract_plugin定义在appbase\appbase\plugin.hpp中。

1
2
3
4
5
6
7
8
9
10
11
12
13
14
15
16
17
18
19
class abstract_plugin {
public:
// 插件的4个状态。
enum state {
registered, ///< the plugin is constructed but doesn't do anything
initialized, ///< the plugin has initialized any state required but is idle
started, ///< the plugin is actively running
stopped ///< the plugin is no longer running
};

virtual ~abstract_plugin(){}
virtual state get_state()const = 0; // 查询插件当前的状态
virtual const std::string& name()const = 0; // 获取插件名称
virtual void set_program_options( options_description& cli, options_description& cfg ) = 0; // 设置插件参数
virtual void initialize(const variables_map& options) = 0;//初始化插件
virtual void handle_sighup() = 0; // 这个干嘛用的不清楚
virtual void startup() = 0; // 启动插件
virtual void shutdown() = 0; // 关闭插件
};

plugin

plugin这个类继承了abstract_plugin,plugin的代码在appbase\apppbase\apllication.hpp中,这里比较奇怪的是,为什么plugin的定义不再plugin.hpp文件中,而plugin.hpp中定义了abstract_plugin类。

plugin是一个模板类,在plugin中,除去handle_sighup函数之外,已经实现了abstract_plugin中的全部纯虚函数。handle_sighup函数的含义,目前我不太清楚。

1
2
3
4
5
6
7
8
9
10
11
12
13
14
15
16
17
18
19
20
21
22
23
24
25
26
27
28
29
30
31
32
33
34
35
36
37
38
39
40
41
42
43
44
45
46
47
48
49
50
51
52
template<typename Impl>
class plugin : public abstract_plugin {
public:
plugin():_name(boost::core::demangle(typeid(Impl).name())){}
virtual ~plugin(){}

virtual state get_state()const override { return _state; }
virtual const std::string& name()const override { return _name; }

virtual void register_dependencies() {
static_cast<Impl*>(this)->plugin_requires([&](auto& plug){});
}

virtual void initialize(const variables_map& options) override {
if(_state == registered) {
_state = initialized;
static_cast<Impl*>(this)->plugin_requires([&](auto& plug){ plug.initialize(options); });
static_cast<Impl*>(this)->plugin_initialize(options);
//ilog( "initializing plugin ${name}", ("name",name()) );
app().plugin_initialized(*this);
}
assert(_state == initialized); /// if initial state was not registered, final state cannot be initialized
}

virtual void handle_sighup() override {
}
// 插件启动函数
virtual void startup() override {
if(_state == initialized) {
_state = started;
static_cast<Impl*>(this)->plugin_requires([&](auto& plug){ plug.startup(); });
static_cast<Impl*>(this)->plugin_startup();
app().plugin_started(*this); //
}
assert(_state == started); // if initial state was not initialized, final state cannot be started
}

virtual void shutdown() override {
if(_state == started) {
_state = stopped;
//ilog( "shutting down plugin ${name}", ("name",name()) );
static_cast<Impl*>(this)->plugin_shutdown();
}
}

protected:
plugin(const string& name) : _name(name){}

private:
state _state = abstract_plugin::registered;
std::string _name;
};

首先可以看到plugin的初始化函数,由于plugin是一个模板类,在初始化过程中,传入的模板类的名称赋值给了plugin的protected变量_name,里面唯一不太理解的是,为什么这个_name是protected的类型而不是private类型。typeid在头文件typeindex中,主要是获得某个类的名称。

此外,plugin中实现了插件的startup()、initialized()和shutdown()三个功能。在initialize()函数中,首先判断当前状态是否是registered状态,随后更改状态为initialized状态,然后查询当前插件依赖的其他插件并且将其他插件初始化,随后初始化插件自身。注意到插件启动完成后有如下一句代码:

1
app().plugin_initialized(*this);

app()函数返回客户端的引用,随后客户端将当前初始化的插件变量放入到当前客户端中已初始化插件的vector中。

在startup()之前,可以看到,插件启动之前,其状态必须是已经初始化的状态,这表明插件启动之前必须初始化。随后设置状态为启动状态。然后查询当前插件启动需要的其他插件并启动这些插件,随后再启动插件自身,随后客户端将当前已启动的插件变量放入到当前客户端中已启动插件的vector中。

在shutdown()函数中,特别厉害的一个设计就是关闭插件的调用,因为不同的插件,可能关闭方式不一样,但是在plugin中仍然也实现了这个方法,实在是太巧妙了。最精髓的就是这句代码:

1
static_cast<Impl*>(this)->plugin_shutdown();

将当前指针转换成模板类初始化时传进的类,然后调用这个类的plugin_shutdown()函数。好像很牛批,可是我仔细一想,最后不还是调用每个类自己的plugin_shutdown()函数了吗,每个类中自己实现这个功能好像也可以,这样设计就是看起来很牛批,但是没什么卵用,奇技淫巧而已~

现在介绍下EOS具体的插件,producer_plugin,这个插件主要负责超级节点的区块生产、同步以及新区快的校验工作,是4个插件里面最重要的一个插件。

producer_plugin

(1). producer_plugin.hpp

producer_plugin插件的实现位于plugins\producer_plugin下。producer_plugin类的定义,就很头铁,定义方式如下。

1
2
3
class producer_plugin : public appbase::plugin<producer_plugin>{
...
};

在定义的过程中就传入了producer_plugin的类名,这个名称会传给plugin中的_name变量。
为什么会有appbase这个玩意儿呢,因为这是一个命名空间,plugin就定义在appbase命名空间中。

接下来我们看看producer_plugin的头文件,由于头文件比较长,口味略重,非战斗人员请迅速撤离。

1
2
3
4
5
6
7
8
9
10
11
12
13
14
15
16
17
18
19
20
21
22
23
24
25
26
27
28
29
30
31
32
33
34
35
36
37
38
39
40
41
42
43
44
45
46
47
48
49
50
51
52
53
54
55
56
57
58
59
60
61
62
63
64
65
66
67
68
69
70
71
72
73
74
75
76
77
78
79
80
81
82
83
84
85
86
87
88
89
90
91
92
93
94
class producer_plugin : public appbase::plugin<producer_plugin> {
public:
APPBASE_PLUGIN_REQUIRES((chain_plugin)(http_client_plugin))

struct runtime_options {
fc::optional<int32_t> max_transaction_time;
fc::optional<int32_t> max_irreversible_block_age;
fc::optional<int32_t> produce_time_offset_us;
fc::optional<int32_t> last_block_time_offset_us;
fc::optional<int32_t> max_scheduled_transaction_time_per_block_ms;
fc::optional<int32_t> subjective_cpu_leeway_us;
fc::optional<double> incoming_defer_ratio;
};

struct whitelist_blacklist {
fc::optional< flat_set<account_name> > actor_whitelist;
fc::optional< flat_set<account_name> > actor_blacklist;
fc::optional< flat_set<account_name> > contract_whitelist;
fc::optional< flat_set<account_name> > contract_blacklist;
fc::optional< flat_set< std::pair<account_name, action_name> > > action_blacklist;
fc::optional< flat_set<public_key_type> > key_blacklist;
};

struct greylist_params {
std::vector<account_name> accounts;
};

struct integrity_hash_information {
chain::block_id_type head_block_id;
chain::digest_type integrity_hash;
};

struct snapshot_information {
chain::block_id_type head_block_id;
std::string snapshot_name;
};

producer_plugin();
virtual ~producer_plugin();

virtual void set_program_options(
boost::program_options::options_description &command_line_options,
boost::program_options::options_description &config_file_options
) override;


// 判断一个公钥是否是当前区块生产者的公钥
bool is_producer_key(const chain::public_key_type& key) const;
// 应该是对摘要进行签名,这里面的key应该是私钥。
chain::signature_type sign_compact(const chain::public_key_type& key, const fc::sha256& digest) const;

// 对插件进行初始化
virtual void plugin_initialize(const boost::program_options::variables_map& options);
// 插件启动函数
virtual void plugin_startup();
// 插件关闭函数
virtual void plugin_shutdown();
// 暂停运行和继续运行
void pause();
void resume();
// 返回插件是否被暂停的状态
bool paused() const;

// 更新运行的相关参数
void update_runtime_options(const runtime_options& options);

// 获取运行时的相关参数
runtime_options get_runtime_options() const;

// 增加grey_list
void add_greylist_accounts(const greylist_params& params);
// 删除grey_list
void remove_greylist_accounts(const greylist_params& params);
// 获取greylist
greylist_params get_greylist() const;

// 获取whitelist和设置whitelist
whitelist_blacklist get_whitelist_blacklist() const;
void set_whitelist_blacklist(const whitelist_blacklist& params);

// 获取integrity_hash_information
integrity_hash_information get_integrity_hash() const;

// 创建一个快照,snapshot中文意思是快照
snapshot_information create_snapshot() const;

// 定义一个返回值为空,传入变量为const chain::producer_confirmation&的signal
// 这个信号用于区块的确认。
signal<void(const chain::producer_confirmation&)> confirmed_block;
private:
// producer_plugin_impl的指针,负责所有任务的执行
// producer_plugin_impl类的定义在producer_plugin.cpp中
std::shared_ptr<class producer_plugin_impl> my;
};

producer_plugin定义完毕之后第一个public函数就很恶心咯,这是什么鬼!!!仔细看看这些大写字母的定义,转换成小写字母,即appbase_plugin_requires,还记得前面说每个插件初始化或者启动的时候都要初始化或者启动它依赖的插件这个过程吗?这感觉应该是说producer_plugin类启动的时候依赖chain_plugin和http_client_plugin两个插件。

1
APPBASE_PLUGIN_REQUIRES((chain_plugin)(http_client_plugin))

大写的显示,应该是说明这一个宏定义,果然,我们翻了一下,宏定义在plugin.hpp文件中,具体定义如下:

1
2
3
4
5
6
7
8
9
#define APPBASE_PLUGIN_REQUIRES( PLUGINS )                               \
template<typename Lambda> \
void plugin_requires( Lambda&& l ) { \
BOOST_PP_SEQ_FOR_EACH( APPBASE_PLUGIN_REQUIRES_VISIT, l, PLUGINS ) \
}

#define APPBASE_PLUGIN_REQUIRES_VISIT( r, visitor, elem ) \
visitor( appbase::app().register_plugin<elem>() )

哇~~~,越来越恶心了,这个宏定义,指向一个模板函数,这个模板函数的参数是一个函数,里面用到了BOOST_PP_SEQ_FOR_EACH,这个一般如下用法:

  • BOOST_PP_SEQ_FOR_EACH(macro, r, data)
  • macro,一个以格式macro(r, data, elem)定义的三元宏。该宏被BOOST_PP_SEQ_FOR_EACH按照seq中每个元素进行展开。展开该宏,需要用到下一个BOOST_PP_FOR的重复项、备用数据data和当前元素。
  • data,备用数据,用于传给macro。
  • seq,用于供macro按照哪个序列进行展开。

具体的细节尚未弄清楚,但是明确的是,这个hpp文件可以看出producer_plugin插件依赖两个插件,即chain_plugin和http_client_plugin。

随后再producer_plugin中定义了一系列结构体。这些结构体都用到了一个optional的类。简单地来说,这个类类似于boost::optional的概念,主要用于实现未初始化的概念。函数并不能总是返回有意义的结果,有时候函数可能返回“无意义”的值,一般来说我们通常使用一个不再正常解空间的一个哨兵来表示无意义的概念,如NULL,-1,end()或者EOF.然后对于不同的应用场合,这些哨兵并不是通用的,而且有时候可能不存在这种解空间之外的哨兵。optional很像一个仅能存放一个元素的容器,它实现了"未初始化"的概念:如果元素未初始化,那么容器就是空的,否则,容器内就是有效的,已经初始化的值。optional的真实接口很复杂,因为它要能包装任何的类型。

定义的这些结构体,我想应该是producer_plugin运行时配置的一些参数,大致知道这个概念即可。随后是producer_plugin的构造函数、析构函数以及设置参数的函数。更加详细的内容,我已经写在注释中,可以参看,至于producer_plugin中一些方法的具体实现,暂时不予理会,知道其作用就可以了。

(2). plugin_startup

producer_plugin.cpp中插件的plugin_shutdown, pause, resume等函数不是很重要,因此这里不再介绍。但是中最重要的一个函数是plugin_startup函数,nodeos节点启动之后,启动producer_plugin插件的接口就是这个函数,这里需对这个函数进行详细的解析,但是我们仍然会跳过一些细枝末节的东西,重点看其主要脉络。由于源码中这个函数内容比较多,这里不再展示源码,直接从主要流程开始。

在函数里面首先获取一个变量:chain

1
chain::controller &chain = my->chain->chain_plug->chain()

my是一个produer_plugin_impl类的智能指针,这个指针具体负责交易的打包、区块的生产和检查等工作。通过chain可以访问到区块链上的一些信息。

随后chain连接两个信号量,分别执行的函数是on_block()和on_irreversible_block。

1
2
my->_accepted_block_connection.emplace(chain.accepted_block.connect([this](const auto &bsp) { my->on_block(bsp); }));
my->_irreversible_block_connection.emplace(chain.irreversible_block.connect([this](const auto &bsp) { my->on_irreversible_block(bsp->block); }));

在boost中,进行connect之后返回一个connection的对象,my将返回的两个对象放入自己的connection容器中。

随后获得了区块链上最近的一个不可逆区块的块号和其指针

1
2
3
const auto lib_num = chain.last_irreversible_block_num();// 返回块号
const auto lib = chain.fetch_block_by_number(lib_num); // 返回指针

如果当前区块指针不为空,则进入my->on_irreversible_block(lib)函数。my->on_irreversible_block函数就是将不可逆区块的时间设置为lib指向的区块的时间。
如果lib指针为空,设置不可逆区块的时间为当前时间的最大值,即设置为0xffffffff秒,时间大致为139年,那时候BM应该早就跪了~

1
2
3
4
5
6
7
if (lib){
my->on_irreversible_block(lib);
}
else{
// maximum 大致是136年
my->_irreversible_block_time = fc::time_point::maximum();
}

接下来,判断my中的区块生产者列表是否为空,若当前节点可以生产区块,如果是第一次接入的超节点,则展示new_chain_banner标志。随后开始进入区块生产的大循环中,区块生产的函是由my控制的。看起来my这个插件无法避免的需要介绍了。

1
2
3
4
5
6
7
8
9
if (my->_production_enabled){
if (chain.head_block_num() == 0)
{ // 如果是创世块,展示新区块的标语
new_chain_banner(chain);
}
//_production_skip_flags |= eosio::chain::skip_undo_history_check;
}
// 开始进入区块生产循环中,持续不断的开始生产区块
my->schedule_production_loop();

至此,plugin_startup函数的主要情况已经介绍完毕,my->schedule_produetion_loop函数的介绍,将在produer_plugin_impl类的介绍中进行。

producer_plugin_impl

producer_plugin_impl类中的变量

produer_plugin_impl类的定义,上来我就懵逼了,这是什么!!!enable_shared_from_this也是一个类,但是这种继承的形式到底是怎么肥四?

1
class producer_plugin_impl : public std::enable_shared_from_this<producer_plugin_impl>

查了一下网上的解释,enable_shared_from_this是c++ 11的新特性,使用这个特性就可以获得一个对象的多个shared_ptr指针,但是又不会造成对象的多次释放问题。具体的解释可以参看下面两个链接:

stack overflow

cpp reference

其初始化函数只有1个,里面_timer完成io操作,_transaction_ack_channel主要接收交易,具体形式如下:

1
2
3
4
public:
producer_plugin_impl(boost::asio::io_service &io)
: _timer(io), _transaction_ack_channel(app().get_channel<compat::channels::transaction_ack>()){
}

老实说,produer_plugin_impl中定义的变量很多,这些变量都是public属性。因为这个类具体负责区块生产,因此涉及到的事务非常繁杂,所以变量比较多也算正常。

1
2
3
4
5
6
7
8
9
10
11
12
13
14
15
16
17
18
19
20
21
22
23
24
25
26
27
28
29
30
31
32
33
34
35
36
37
38
39
40
41
42
43
44
45
46
47
48
49
50
51
52
53
54
55
56
57
58
59
60
61
62
63
64
65
66
67
68
69
70
71
72

optional<fc::time_point> calculate_next_block_time(const account_name &producer_name, const block_timestamp_type &current_block_time) const;
void schedule_production_loop();
void produce_block();
bool maybe_produce_block();

boost::program_options::variables_map _options; // 程序启动的一些选项
bool _production_enabled = false; //能够生产区块
bool _pause_production = false; // 是否暂停生产
uint32_t _production_skip_flags = 0; //eosio::chain::skip_nothing;

// 这是啥玩意,我不明白
using signature_provider_type = std::function<chain::signature_type(chain::digest_type)>;
// 映射公钥和签名
std::map<chain::public_key_type, signature_provider_type> _signature_providers;
std::set<chain::account_name> _producers; // BP名单
boost::asio::deadline_timer _timer; // 负责io的_timer
std::map<chain::account_name, uint32_t> _producer_watermarks; // BP的水印
pending_block_mode _pending_block_mode; // 添加区块的模式,producing和speculate两个模式
transaction_id_with_expiry_index _persistent_transactions; // 过期的交易
fc::optional<boost::asio::thread_pool> _thread_pool; // 线程池

int32_t _max_transaction_time_ms; // 交易的延迟时间
fc::microseconds _max_irreversible_block_age_us;
// 非最后一个区块产生时间的偏移量,按微秒计算。负值会导致块更早出去,正值会导致块更晚出去。
int32_t _produce_time_offset_us = 0;
// 最后一个区块产生时间的偏移量,按微秒计算。负值会导致块更早出去,正值会导致块更晚出去。
int32_t _last_block_time_offset_us = 0;
int32_t _max_scheduled_transaction_time_per_block_ms; // 一个区块全部交易打包完毕的最大时间耗费

fc::time_point _irreversible_block_time; // 不可逆区块的时间
fc::microseconds _keosd_provider_timeout_us; // 钱包客户端超时时间 us为单位

time_point _last_signed_block_time; // 最近一个签名区块的时间
time_point _start_time = fc::time_point::now(); // 启动时间,当前时间
uint32_t _last_signed_block_num = 0; // 最近一个签名区块的块号

producer_plugin *_self = nullptr; // 指向producer_plugin的指针
chain_plugin *chain_plug = nullptr; // 指向chain_plugin的指针

incoming::channels::block::channel_type::handle _incoming_block_subscription; // 订阅收到的区块?
incoming::channels::transaction::channel_type::handle _incoming_transaction_subscription; // 订阅收到交易?

compat::channels::transaction_ack::channel_type &_transaction_ack_channel; // 接收交易的通道

incoming::methods::block_sync::method_type::handle _incoming_block_sync_provider; // 同步区块的数据提供方
incoming::methods::transaction_async::method_type::handle _incoming_transaction_async_provider; // 同步交易的数据提供方

transaction_id_with_expiry_index _blacklisted_transactions; // 超时交易的id

fc::optional<scoped_connection> _accepted_block_connection; // 存储已经接收区块的connection
fc::optional<scoped_connection> _irreversible_block_connection; // 存储不可逆区块的connection

/*
* HACK ALERT
* Boost timers can be in a state where a handler has not yet executed but is not abortable.
* As this method needs to mutate state handlers depend on for proper functioning to maintain
* invariants for other code (namely accepting incoming transactions in a nearly full block)
* the handlers capture a corelation ID at the time they are set. When they are executed
* they must check that correlation_id against the global ordinal. If it does not match that
* implies that this method has been called with the handler in the state where it should be
* cancelled but wasn't able to be.
*/
uint32_t _timer_corelation_id = 0;

// keep a expected ratio between defer txn and incoming txn
double _incoming_trx_weight = 0.0;
double _incoming_defer_ratio = 1.0; // 1:1

// path to write the snapshots to
bfs::path _snapshots_dir;

可能会奇怪,为什么my指针中的变量,在其初始化函数中都没有看到初始化的工作,例如其中的chain_plugin和producer_plugin指针。实际上,my中这些变量的初始化工作已经在producer_plugin的initialized函数中初始化完毕了。

schedule_production_loop 函数

producer_plugin的startup函数中就是调用了producer_plugin_impl中的shcedule_production_loop函数开始生产区块。因此,我们首先从这个函数入手,开始分析producer_plugin_impl是如何生产区块的。

函数首先获得了chain的引用和指向producer_plugin_impl的一个weak_ptr指针,关闭了_timer的io操作。

1
2
3
4
chain::controller &chain = chain_plug->chain();
_timer.cancel(); // _timer 是boost库中asio的一个定时器,关闭所有异步等待
std::weak_ptr<producer_plugin_impl> weak_this = shared_from_this();
auto result = start_block()

随后尝试生产区块,调用了start_block函数,start_block函数返回结果有succeed,failed,waiting,exhausted4种,针对4中情况分别执行不用的流程。

  1. failed, 获取各种调度信息异常,则重新获取数据进行调度;

  2. waitting,其它节点正在出块,则进行等待;

  3. producing,轮到本节点出块,则进行出块操作;

  4. succeed,生产区块成功,计算下一个生产者出块的时间。

当start_block()返回结果为failed的时,进入异步等待状态,稍后再尝试生产区块。

1
2
3
4
5
6
7
8
9
10
11
12
13
14
15
16
    if (result == start_block_result::failed)
{
elog("Failed to start a pending block, will try again later");

_timer.expires_from_now(boost::posix_time::microseconds(config::block_interval_us / 10)); // 0.05秒后定时器失效

// 稍后继续尝试schedule_production_loop()函数
_timer.async_wait([weak_this, cid = ++_timer_corelation_id](const boost::system::error_code &ec) {
// 获得this的shared_ptr指针以判断是否被销毁,销毁返回空的shared_ptr
auto self = weak_this.lock();
if (self && ec != boost::asio::error::operation_aborted && cid == self->_timer_corelation_id)
{
self->schedule_production_loop();
}
});
}

如果返回结果是waiting,表示本地的区块链还在从eos网络中下载区块已进行信息同步过程中,这个过程中还无法生产区块。随后查看当前是否还能继续生产区块,如果可以,则待会儿生产区块,即调用函数schedule_delayed_production_loop,这个函数这里不再进行仔细分析,主要就是过一段时间后这个函数中还会调用schedule_production_loop函数进行区块生产。
返回结果时waiting的情况下,对应代码如下:

1
2
3
4
5
6
7
8
9
10
11
12
13
14
15
else if (result == start_block_result::waiting)
{ // 当前还在同步区块信息,等待中...
// waiting的状态有两种情况,要么生产区块的BP名单为空,或者是生产区块受外部命令而停止
if (!_producers.empty() && !production_disabled_by_policy())
{
fc_dlog(_log, "Waiting till another block is received and scheduling Speculative/Production Change");
// 过会儿再进行区块生产
schedule_delayed_production_loop(weak_this, calculate_pending_block_time());
}
else
{
fc_dlog(_log, "Waiting till another block is received");
// 其他区块还没有同步完毕,因此急需等待同步完成才能生产区块
}
}

如果返回结果是speculateing模式,并且还可以继续进行区块生产,但是生产者不确定这个区块是否合法,所以小心翼翼的过一会儿继续生产区块,过程如下:

1
2
3
4
5
6
7
else if (_pending_block_mode == pending_block_mode::speculating && !_producers.empty() && !production_disabled_by_policy())
{
fc_dlog(_log, "Specualtive Block Created; Scheduling Speculative/Production Change");
EOS_ASSERT(chain.pending_block_state(), missing_pending_block_state, "speculating without pending_block_state");
const auto &pbs = chain.pending_block_state();
schedule_delayed_production_loop(weak_this, pbs->header.timestamp);
}

如果返回结果是producing模式,表示已经成功的生产了一个区块,但是还需要其他一些验证工作。这里有个问题就是,为什么speculating模式下没有验证,非得在producing模式下验证生产的区块呢?

首先验证区块截止时间是否大于当前时间,如果大于当前时间,表明生产区块成功在截止日期内,是合法的区块,然后记录日志。如果截止日期超过现在,表明生产的区块已经过期了,此时将生产区块的时间减小0.5s,看是否超时并记录日志,这一步完成之后进行区块的同步操作。
代码如下:

1
2
3
4
5
6
7
8
9
10
11
12
13
14
15
16
17
18
19
20
21
22
23
24
25
26
27
28
29
30
31
32
33
34
35
36
37
38
39
40
41
42
else if (_pending_block_mode == pending_block_mode::producing)
{
// 成功打包了一个区块,但是得看看打包的区块是否超时
static const boost::posix_time::ptime epoch(boost::gregorian::date(1970, 1, 1));
// pending_block_time 返回最后一个区块的时间戳(是刚刚生产的区块的时间戳还是之前有效区块的时间戳,暂时还不清楚)
auto deadline = calculate_block_deadline(chain.pending_block_time());

if (deadline > fc::time_point::now())
{
// ship this block off no later than its deadline
EOS_ASSERT(chain.pending_block_state(), missing_pending_block_state, "producing without pending_block_state, start_block succeeded");
_timer.expires_at(epoch + boost::posix_time::microseconds(deadline.time_since_epoch().count()));
fc_dlog(_log, "Scheduling Block Production on Normal Block #${num} for ${time}", ("num", chain.pending_block_state()->block_num)("time", deadline));
}
else
{
EOS_ASSERT(chain.pending_block_state(), missing_pending_block_state, "producing without pending_block_state");
auto expect_time = chain.pending_block_time() - fc::microseconds(config::block_interval_us);
// ship this block off up to 1 block time earlier or immediately
if (fc::time_point::now() >= expect_time)
{
_timer.expires_from_now(boost::posix_time::microseconds(0));
fc_dlog(_log, "Scheduling Block Production on Exhausted Block #${num} immediately", ("num", chain.pending_block_state()->block_num));
}
else
{
_timer.expires_at(epoch + boost::posix_time::microseconds(expect_time.time_since_epoch().count()));
fc_dlog(_log, "Scheduling Block Production on Exhausted Block #${num} at ${time}", ("num", chain.pending_block_state()->block_num)("time", expect_time));
}
}

_timer.async_wait([&chain, weak_this, cid = ++_timer_corelation_id](const boost::system::error_code &ec) {
auto self = weak_this.lock();
if (self && ec != boost::asio::error::operation_aborted && cid == self->_timer_corelation_id)
{
// pending_block_state expected, but can't assert inside async_wait
auto block_num = chain.pending_block_state() ? chain.pending_block_state()->block_num : 0;
auto res = self->maybe_produce_block();
fc_dlog(_log, "Producing Block #${num} returned: ${res}", ("num", block_num)("res", res));
}
});
}

如果对其他一些细节的代码不太明白,也不必在意,因为我也不太清楚。但是我们注意到同步操作中的一段代码,如下:

1
2
3
4
5
6
7
8
9
10
11
12
_timer.async_wait(
[&chain, weak_this, cid = ++_timer_corelation_id](const boost::system::error_code &ec) {
auto self = weak_this.lock();
if (self && ec != boost::asio::error::operation_aborted && cid == self->_timer_corelation_id)
{
// pending_block_state expected, but can't assert inside async_wait
auto block_num = chain.pending_block_state() ? chain.pending_block_state()->block_num : 0;
auto res = self->maybe_produce_block();
fc_dlog(_log, "Producing Block #${num} returned: ${res}", ("num", block_num)("res", res));
}
});

_timer.async_wait应该是将生产出来的在群里面广播。这个函数接受一个lambda函数,表示同步的方法,同步过程中有一个maybe_produce_block()函数,我想应该是某个block procuder(以后简称BP)生产了一个区块,但是还没有得到其他BP的确认,这是个进行同步请求确认的过程。因此,我们再仔细看看进行同步的细节(不过貌似很多细节我也看不懂哎…囧…)。

mayb_produce_block函数的主要内容如下:

1
2
3
4
5
6
7
8
9
10
11
12
13
14
15
16
17
18
19
20
21
22
23
24
25
26
27
28
29
30
31
32
bool producer_plugin_impl::maybe_produce_block()
{
auto reschedule = fc::make_scoped_exit([this] {
schedule_production_loop();
});

try
{
try
{
produce_block();
return true;
}
catch (const guard_exception &e)
{
chain_plug->handle_guard_exception(e);
return false;
}
FC_LOG_AND_DROP();
}
catch (boost::interprocess::bad_alloc &)
{
raise(SIGUSR1);
return false;
}

fc_dlog(_log, "Aborting block due to produce_block error");
chain::controller &chain = chain_plug->chain();
chain.abort_block();
return false;
}

上来就是一句我不懂的函数:

1
2
3
4
5
auto reschedule = fc::make_scoped_exit(
[this]{
schedule_production_loop();
}
);

也就是说,往里面传了一个lambda函数,函数就是重复生产区块的函数。但是fc::make_scope_exit又是什么意思呢?这里面大概介绍一下,make_scoped_exit函数中传入一个lambda函数,may_produe_block函数结束时reschedule函数只是定义了一下,reschedule隶属于scoped_exit类,这个类的析构函数中调用了schedule_production_loop();表明函数结束之后继续生产区块。
随后may_produce_block中有一个重要的函数,即produce_block()函数,我们继续追踪,这个函数代码如下:

1
2
3
4
5
6
7
8
9
10
11
12
13
14
15
16
17
18
19
20
21
22
23
24
25
26
27
28
29
30
31
32
33
34
35
36
37
38
39
void producer_plugin_impl::produce_block()
{
//ilog("produce_block ${t}", ("t", fc::time_point::now())); // for testing _produce_time_offset_us
EOS_ASSERT(_pending_block_mode == pending_block_mode::producing, producer_exception, "called produce_block while not actually producing");

chain::controller &chain = chain_plug->chain();
// 获取当前打包好的区块的指针
const auto &pbs = chain.pending_block_state();
// 获取打包的区块的区块头
const auto &hbs = chain.head_block_state();
EOS_ASSERT(pbs, missing_pending_block_state, "pending_block_state does not exist but it should, another plugin may have corrupted it");
// 寻找BP的私钥
auto signature_provider_itr = _signature_providers.find(pbs->block_signing_key);

EOS_ASSERT(signature_provider_itr != _signature_providers.end(), producer_priv_key_not_found, "Attempting to produce a block for which we don't have the private key");

//idump( (fc::time_point::now() - chain.pending_block_time()) );
// 将区块内容写入数据库中,确定区块头中的merkel_root等内容
chain.finalize_block();

// 对区块进行签名
chain.sign_block([&](const digest_type &d) {
auto debug_logger = maybe_make_debug_time_logger();
return signature_provider_itr->second(d);
});
// 往本地的分叉的区块链数据库中提交区块,因为还没有确认
chain.commit_block();
// 获取区块时间戳
auto hbt = chain.head_block_time();
//idump((fc::time_point::now() - hbt));

// 获取刚刚添加的最新的区块头状态
block_state_ptr new_bs = chain.head_block_state();
// 记录最新的区块生产者和其生产的区块号
_producer_watermarks[new_bs->header.producer] = chain.head_block_num();

ilog("Produced block ${id}... #${n} @ ${t} signed by ${p} [trxs: ${count}, lib: ${lib}, confirmed: ${confs}]",
("p", new_bs->header.producer)("id", fc::variant(new_bs->id).as_string().substr(0, 16))("n", new_bs->block_num)("t", new_bs->header.timestamp)("count", new_bs->block->transactions.size())("lib", chain.last_irreversible_block_num())("confs", new_bs->header.confirmed));
}

至此,大致对producer_plugin这个插件的内容以及主要功能有一个大致的了解。
这个插件主要负责区块的接收、检验、打包和本地写入功能。

An Empirical Analysis of Anonymity in Zcash

发表于 2019-03-14 | Edited on 2023-03-05 | 分类于 区块链技术研究

1. Zcash的相关知识介绍

1.1 Zcash的工作原理

Zcash是一种从Bitcoin中分叉出来的代币, 其目的在于解决bitcoin中交易在执行过程中可以利用区块追踪交易记录的问题,进而使得交易难以追踪以提高匿名性.
Zcash中的地址有两种,一种叫做transparent address,简称t-address,这种地址以t开头. 另外一种地址叫做shielded address, 这种地址以z开头.Zcash中大概有如下4种交易类型,如下图所示:

z-address 到z-address的转账称之为Private transactions, z-address 到t-address的转账称之为Deshielding transactions, t-address到z-address的转账叫做Shielded transactions, 而t-address到t-address的转账叫做transparent transactions.

  1. t-to-t transaction

    两个t-address之间的交易, 和Bitcoin中的交易完全相同,交易双方的地址, 交易费, 交易金额都是公开并且可以追踪的.一个典型的示例如下:

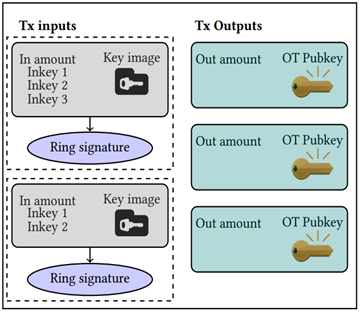
    这笔交易中, 有一个输入,2个输出,输入和输出的地址都是t开头.
  2. t-to-z transaction

    t-to-z transaction中,可以叫做shielded transaction, 只能看到输入地址, 即以t开头的地址,交易费等信息, 但是输出的具体地址以及地址个数是未知的.

    这笔交易中,只有1个输入,输入代币总量以及交易费也是已知的,但是输出的地址以及输出地址的个数是未知的, 最终输入的其他ZEC流入了shielded pool中.

  3. z-to-t transaction

    z-to-t transaction,又叫做 deshielded transaction,即从shielded pool中的代币转出至某个特定的t-address中.

    上图中,交易的输入地址和输入地址的个数未知,但是知道输出地址的数量和具体信息,同时输出代币数和交易费用已知.

  4. z-to-z transaction

    z-address 到z-address的转账称之为Private transactions,从z-toz交易中只能得知交易费。但是交易地址、地址数量以及交易的ZEC数目都是未知的。

    这笔交易中,输入地址和输出地址的数量以及具体信息都是未知的,唯一能确定的是交易费用。z-to-z地址之间的转换,就相当于在shielded pool中进行持续转账。所有z-address中的ZEC就组成了shielded pool.

1.2 JoinSplits

简单的理解, 从t-add 转入 z-addr的转账交易,即将ZEC转入到shielded pool中,因此叫做shielded交易,而从z-addr转到t-addr的交易, 即从shielded pool中转出ZEC, 因此叫做deshielded 交易, z-address之间的转账,则称之为private transaction.

从上述4中交易的介绍中, 可以观察发现,只有t-address和t-address之间的转账中没有JoinSplits, 而凡是涉及到z-addrress的交易,图中都会有一个JoinSplits的字段, JoinSplits字段中指定了交易中ZEC的来源和去向,以及其中的零知识证明,这个证明允许其他人在不揭露交易内容的前提下验证加密交易的真实性. 关于阅读本论文, 我们只需要知道这个就可以了.

更多关于零知识的证明,感兴趣可以点击zk-SNARKs以及如下几个链接.

  • ZCash中的Transaction: https://z.cash/technology/#viewing-keys

  • ZCash中的Anatomy: https://z.cash/blog/anatomy-of-zcash/ * ZCash协议详解: https://github.com/zcash/zips/blob/master/protocol/protocol.pdf (交易细节可以参看3.4节)

  • ZCash零知识证明: https://z.cash/zh/technology/zksnarks/

1.3 Zcash的主要参与者

Zcash中的参与人主要有4类,

  • 创始人(Founders),

  • 矿工(Miners),

  • 服务提供商(Services)

  • 用户(Users).

在Zcash刚开始挖矿的4年中,每次矿工挖出一个区块时,都需要将25%的出块奖励转发给创始人团队, 一个区块的出块奖励为12.5ZEC, 创始人拿到2.5ZEC, 矿工拿到10ZEC.

2. 论文主要内容简要介绍

2.1 主要研究方法和内容介绍

这篇文章发表于2018年第27届USENIX Security Symposium会议,本论文非常深入的分析了Zcash的匿名程度,文章首先对Zcash区块链中的区块链信息进行了统计说明, 统计结果表明Zcash区块链中, 85%的交易都是transparent 交易, 而匿名的交易仅仅占比25%左右.
随后对Zcash中的交易(t-to-t, z-to-t, t-to-z, z-to-z), 使用5种启发式方法进行分析并尝试对其中的地址所对应的用户进行标记.通过文章中的启发式方法的分析,分别发现了创始人和矿工在进行z-to-t和t-to-z交易时的一些明显的特征, 利用这些特征识别出了创始人和矿工的隐匿的地址,同时也对其他一些黑客组织的地址进行了识别. 文章的5个启发式分析方法主要介绍如下:

  • 启发式方法1: Zcash一笔交易中的多个输入地址都由同一个实体控制.

    • 将Zcash区块链中每一个地址当做1个顶点, 同一笔交易中的多个输入地址之间用无向边连接, 以此完成了对Zcash中所有t-address的聚类, 总共得到560319个簇.

    • Zcash中的铸币交易, 一个区块产生12.5个ZEC, 其中10个归属矿工, 2.5个归属创始人, 因此每个区块的铸币交易中可以确定并且准确的标记出创始和矿工t-address.

    • 分别从Top10的交易所购买Zcash, 随后在交易所的地址和自己Zcash的地址之间多次转账, 根据转账记录标记出交易所的地址.

  • 启发式方法3: 任何交易值是250.0001ZEC的z-to-t转账交易时由创世团队发起

    • 这是因为在文章作者在研究t-to-z的交易时, 发现创始团队比较有规律的往shielded pool转账, 每次转账249.9999ZEC, 这些t-to-z转账交易的时间间隔是6~10个区块. z-to-t的交易中, 有很多转账交易是价值250.0001ZEC的交易,这些交易也前后时间间隔是 6~10个区块,作者认为这是一种创世团队提取ZEC的一种自动转账脚本.

    • 基于上述假设, 发现了创始人团队z-to-t转账中额外的75个地址, 而前面启发式方法1中发现了48个地址, 于是总共发现了123个创始人团队的地址.

    • 创世人以为执行了t-to-z交易之后将自己的ZEC转入shielded pool, 随后从shielded pool中发起z-to-t的交易将ZEC转出, 结果使用了脚本, 于是作者利用启发式方法3建立了t-to-z 和z-to-t交易之间的联系,这是其重大意义所在.

  • 启发式方法4: 如果1个z-to-t的交易中,输出地址超过100个,并且其中一个输出地址是一个已知的矿池地址, 那么认为其他输出地址也是矿工地址

    • 这个假设的前提是因为在Zcash中, 矿工挖矿成功之后铸币交易的ZEC,必须先转入shield pool, 即先执行一个t-to-z交易, 随后从shield pool 转出时矿池将每个矿工的收益分别发送给矿工,剩余ZEC退回到矿池的地址.
    • 通过上述的方法,确定了110918个矿工的地址, 启发式方法4能够将矿工的t-to-z和z-to-t转账交易中的t-address联系起来.
  • 启发式方法5: 如果一笔t-to-z的交易, 交易值是V, 随后的一段时间内, 出现了一笔转账交易值也是V的z-to-t的交易, 则认为这笔交易时相关的

    • 这个假设听起来很容易造成false positive, 但是实际上 总共有12841笔t-to-z和对应的z-to-t交易, 这些对应的交易都有着完全不同的交易值, 其中的9487笔交易精确到小数点后8位, 超过98.9%的交易精确到小数点后3位, 基于这个事实,基本可以认为这些交易是相关的.

注意, 上文没有介绍启发式方法2, 这是因为论文中仅仅介绍了该方法,但是考虑到实际的可靠性,并没有采用该方法.

2.2 文章结论

  • 通过上述启发式的方法, 作者能将shielded pool 中转账交易中69.1%的地址进行标记,这严重的降低了ZCash的匿名性功能. 大多数的用户并没有很好地使用ZCash的匿名性, 或者说与shield pool 进行交互进行匿名的方式仍然留下了线索从而被识别出来, 这减少了ZCash 中的匿名集的范围, 也严重的损害了其他用户的匿名性. 论文更多资料会议网址及资料点击这里.

3. 匿名性方面的其他研究

匿名性方面的研究工作, 目前的研究方向是两种, 一种是建立一个更好的匿名性的机制, 以增强区块链中的匿名性, 例如目前的CoinJoin,Mix混币技术,或者是建立新的Dash, Monero以及Zcash等匿名性更强的币种. 另外一方面的研究工作, 则是通过分析方法,指出目前区块链匿名性技术方面的不足.

  • 有一些学者致力于研究 混币(mix) 服务或者是建立新的币种的方法以提高匿名性, 或者致力于创建一种新的加密货币, 例如Dash, CoinJoin技术已经Monero和Zcash. 参考文献如下:

    • E. Heilman, L. Alshenibr, F. Baldimtsi, A. Scafuro, and S. Goldberg. TumbleBit: an untrusted Bitcoin-compatible anonymous payment hub. In Proceedings of NDSS 2017, 2017
    • A. E. Kosba, A. Miller, E. Shi, Z. Wen, and C. Papamanthou. Hawk: The blockchain model of cryptography and privacypreserving smart contracts. In 2016 IEEE Symposium on Security and Privacy, pages 839–858, San Jose, CA, USA, May 22–26, 2016. IEEE Computer Society Press
    • S. Meiklejohn and R. Mercer. Mobius: Trustless tumbling for transaction privacy. Proceedings on Privacy Enhancing Technologies, 2018
    • T. Ruffing, P. Moreno-Sanchez, and A. Kate. CoinShuffle: Practical decentralized coin mixing for Bitcoin. In M. Kutylowski and J. Vaidya, editors, ESORICS 2014, Part II, volume 8713 of LNCS, pages 345–364, Wroclaw, Poland, Sept. 7–11, 2014. Springer, Heidelberg, Germany.
    • G. Maxwell. CoinJoin: Bitcoin privacy for the real world. bitcointalk.org/index.php?topic=279249, Aug. 2013.
    • Dash. https://www.dash.org.
    • Monero. https://getmonero.org.
    • Zcash. https://z.cash.
  • 另外一些研究致力于通过一些方法检验加密货币的匿名性,指出其限制性.这些所有的研究都有共同的方案,就使用一些启发性的方法, 然后对所有的交易地址进行聚类, 再对聚类之后的地址进行标记以识别出这些地址的具体隶属信息. 目前已经有一些论文, 对Dash, Monero, CoinJoin以及Zcash的匿名性都进行了分析, 相关文献如下:

  • A. Kumar, C. Fischer, S. Tople, and P. Saxena. A traceability analysis of Monero’s blockchain. In Proceedings of ESORICS 2017, pages 153–173, 2017.

  • A. Miller, M. Moser, K. Lee, and A. Narayanan. An ¨ empirical analysis of linkability in the Monero blockchain. arXiv:1704.04299, 2017. https://arxiv.org/pdf/1704.04299.pdf

  • P. Moreno-Sanchez, M. B. Zafar, and A. Kate. Listening to whispers of Ripple: Linking wallets and deanonymizing transactions in the Ripple network. Proceedings on Privacy Enhancing Technologies, 2016(4):436–453, 2016

  • P. Moreno-Sanchez, M. B. Zafar, and A. Kate. Listening to whispers of Ripple: Linking wallets and deanonymizing transactions in the Ripple network. Proceedings on Privacy Enhancing Technologies, 2016(4):436–453, 2016

  • J. Quesnelle. On the linkability of Zcash transactions. arXiv:1712.01210, 2017. https://arxiv.org/pdf/1712.01210.pdf

4. 思考

  • 通过对这篇文章的阅读, 大概对区块链匿名性方面的研究有了一些初步的了解, "An Empirical Analysis of Anonymity in Zcash"这篇文章中的方法比较简单, 但是这些简单的方法应该是基于大量的研究分析工作得来的. 刚开始阅读完这篇文章的时候,我并没有认为这篇文章具有很大的贡献程度.

  • 这篇文章能够发表在USENIX上,我觉得原因如下:

    1. 文章的工作量很大, 对Zcash中所有的区块数据和交易都进行了大量的统计分析工作, 使得读者能对Zcash有一个非常直观的认知.
    2. 文章中使用了5种针对Zcash的启发式分析方法, 对t-address进行聚类, 随后进行标记, 然后建立tt-to-z和z-to-t这一匿名转账操作之间的联系, 找到了许多创始人和矿工的地址, 推理方法有理有据,分析比较到位.
    3. 该文章是第一个对Zcash的匿名性进行分析的文章, 指出了Zcash的弱点, 这就是对Zcash的匿名性的改进提供了方向.
  • 文章通过大量的分析和工作说明了一个问题, 即Zcash的匿名性并不仅仅是由零知识证明技术决定的, Zcash的用户在进行t-to-z交易和z-to-t交易中转换以隐藏自己身份的时候, 应该使用一种更加匿名的方式.一旦Zcash用户不能很好地隐匿自己, 其他用户的隐私性也会受到威胁.

5. 对文章分析方法的详细阅读解析

5.1 Zcash的统计信息

作者这里所说的所有区块统计信息,都是以2018年1月21日为止.

5.1.1 区块生产信息

作者使用zcashd客户端下载Zcash 区块链,将区块链载入Apache Spark中,随后使用pySpark包进行分析.截止2018年1月21日为止, 总共生产了258472个区块, 产生了31,06,043个ZEC, 其中矿工分得2,485,461, 创始人团队获得621,182 ZEC. 这里有个疑问是总共产生258472个区块,如果每个区块的reward为12.5, 那么总共应该产生3,230,900ZEC,但是实际上并没有这么多,这是因为最初的 20,000 个块的奖励很少,从第 1 个块开始到第 20,000 个块的奖励线性增加,在第 20,000 个块处奖励 12.5 个Zcash. 官方解释说这样做的目的是为防止早期的快速挖矿对 Zcash 系统造成伤害。 Zcash 系统每 2.5 分钟一个块,20,000 个块之后,每个块奖励 12.5 个Zcash。

5.1.2 交易(Transactions)

所有区块总共2,242,847笔交易, 交易具体分布信息如Table.1 所示.


Table.1 中transparent指的是t-to-t交易的数量, Coingen指的是铸币交易, Deshielded指的是z-to-t的交易, shielded 指的是t-to-z交易.Mixed指的是混合交易,即一笔交易的输入或者输出中都包含t和z地址的交易. Private指的是z-to-z交易.
从表中显然可以看出, t-to-t交易仍然占有很大的比例,它与铸币交易总共占全部交易的85%, 与shielded pool有关的交易仅仅有335,630笔,总共占有14.96%的比例.

在Fig.2中,展示了随着时间的增长, Zcash区块链中各种交易所占的比例变化趋势,图中可以看出, Coingen, shielded以及deshielded交易都呈现出线性增长的情况,将在后续分析中分析其成因.

Fig.3图揭示了随着时间增长,各种交易中涉及的ZEC比例变化趋势图. 从Fig.3 和Fig.2 的综合分析中, 可以看出与shielded pool的交易呈现出线性增长的趋势, 但是总ZEC的价值却呈现越来越小的比例, transparent交易的比例越来越高.

5.1.3 地址(Addresses)统计信息

在所有的交易中, 有1,740,378个t-address, 其中8727笔交易时t-to-z trx, 另外330,780笔交易时z-to-t trx. 这两种交易不对称行的原因,是由于矿池的一些操作导致.矿池使用极少数量的地址收集block reward, 但是分配block reward时需要分别转给矿池中的每个矿工.由于shielded pool的存在, 无法探知到具体有多少z-address的存在.

Fig.4展示了shielded pool中ZEC随着时间增长的变化情况, 在图中有比较明显的震荡点, 而这是由于Zcash创始人的转账操作导致,后续会对这种情况给出更为具体的解释.截止到撰写本文的时间,shielded pool中总共有112, 235的ZEC.

分别对t-address中的地址拥有ZEC的数量进行排序, 可以发现其中只有25%的地址中的ZEC数量大于0, 而在这25%的地址中, 其中前1%的地址拥有78%的ZEC. 拥有ZEC最多的账户拥有118,257.75个ZEC, 这比整个shielded pool中的ZEC还要多!

截止目前为止,论文作者主要介绍了ZCash中一些统计信息,使读者对整个ZCash有一个大概的了解, 下文中,对ZCash进行一些启发式的分析方法.

6. T-Address Clustering

因为Zcash中从t-address地址发出的的交易与Bitcoin中的交易类似, Bitcoin中对同一笔交易中的多个输入聚类的方法同样可以用来对Zcash中同一笔交易的多个t-address进行聚类. 因此,论文提出Heuristic 1, 具体解释如下:

Heuristic 1: 如果有多个t-address作为输入出现在同一笔交易中,无论这笔交易是t-to-z或者t-to-t抑或是Mixed交易, 我们都认为这些地址受同一个实体的控制.

鉴于这种启发式的方法已经在Bitcoin中采用, 而Zcash又是Bitcoin的一个分叉,因此认为这个论断基本上是可信的.随后作者按照该方法对Zcash中的所有交易进行了聚类,假设交易中的每个t-address是一个节点, 则对同一笔交易中的多个输入用一条无向边链接, 随后得到聚类结果.经过聚类后得到560, 319个cluster, 其中97,539个cluster包含至少2个t-address.

这种启发式的方法可以发现由同一实体控制的多个地址,但是却不能有效的追踪常见的地址变换情况, 最常见的地址变换情况是一个sender使用地址Addr_A将ZEC发送给recipient,此外还有一部分的ZEC作为找零转到了自己的另外一个地址Addr_B上,随后如果sender仅仅将在一笔交易中心仅仅以Addr_B作为输入将剩余ZEC全部花出去时,上述启发式方法无法建立Addr_A和Addr_B之间实际上由同一实体控制的情况.

Heuristic 2: 如果在一笔交易的JoinSplit的input中有一个或者多个地址是t-address(代号t_addr_A), 而第二个input地址(代号t_addr_B)同时又是唯一的一个output t-address,那么 t_addr_B和t_addr_A隶属于同一实体控制.

这个假设实在是,作者先到了这个假设,但是实际上由于Zcash的一个钱包–zcash4win的存在,有些用户会给钱包开发者一些费用,因此这个可能是个例外,于是作者并没有采用这个方法.

6.1 Tagging address(标记各种地址)

6.1.1 标记交易所的地址

根据已有的clusters, 作者下一步目标是对这些cluster进行标记,以确定他们是Zcash的4类用户中的哪一类. 首先对交易所进行标记, 作者首先根据20家交易所的市场占有率,选出其中的top-10交易所, 随后分别从这些交易所中购入一些Zcash,然后在交易所的地址和自己注册的Zcash地址之间多次进行转账,每次转账的时候都对相应的交易所的地址进行标记.这样就可以确定相应交易所所在的cluster, 文章作者分别对每个cluster进行了标记,以每个簇中地址的个数从大到小排序,最大的簇标记为0, 与top-10交易所之间的交易次数,随后确定的交易所在的簇的编号, 具体结果如Table. 2所示.其中ShapShift是一家公司, 用户可以通过这个账户进行币种转换.

6.1.2 标记创始人和矿工的地址

收集创始人已经公开的地址,同时从区块中标记矿工的地址, 验证矿工地址标记的正确性, 可以直接通过矿池网站查看矿池的为挖出区块的声明.

6.1.3 结果

矿工和创始人

其中发现有一些矿工的地址是交易所的地址,这说明有些矿工直接将所属交易所的地址用来接收block reward, 这样为的是方便提现, 同时有一些创始人的地址也隶属于交易所.
Table2中可以看出ShapeShift的使用频率非常高,已经收到超过1.1M 的ZEC, 同时发送的ZEC几乎是等量的.与交易所不同,它的集群包含相对较少数量的矿工地址(54),这与其用作转移资金的方式相符,而不是将其存放在钱包中。
尽管矿池和创始人在Zcash中非常活跃,但是由于他们只使用少部分的地址, 因此他们的地址形成的簇不太大.

公开的组织

另外,通过调查,发现了3个比较大的接收Zcash支付的组织:the Internet Archive, torservers.net以及Wikileaks. 其中torservers.net只通过z-address接收转账.因此无法识别出他们发起的交易. Wikileaks 也是只通过z-address接收转账.Internet Archive的31笔转账中总共转账17.3ZEC, 9笔交易是匿名的. Wikileaks的20笔转账交易全部是t-to-t交易,并且所有的地址单独成簇.

7. 与Shielded Pool的交互

这部分分析t-to-z和z-to-t交易.随着时间增长,总共有3,901,124的ZEC进入pool中,随后又有3,788,889的ZEC从pool中取出.Fig 5描述了这一情况, 基本上存储和取回的数量持平,并且呈现对称形式.这表明很多用户存入pool之后会很快的取回他们的ZEC.另外,图中有很明显的4处尖峰.第一处尖峰发生在2016年12月份,由1笔pool中取回7135ZEC的交易, 这笔ZEC分别转给15个t-address,这15个账户属于创始人. 第二处尖峰发生在2017年12月25日, 在242642个区块上,10,000ZECX分别转给10个t-address, 每个t-address收到了1,000ZEC, 目前这10个账户并没有进行任何交易.另外两次的t-to-z的尖峰是, 每个t-address都单独成一个簇,在后续中会说明与创始人有关.

利用标记好的创始人信息和矿工的地址信息,分析这些包含创始人地址或者包含矿工地址的t-to-z转账交易, 得到Figure 6. 根据Figure 6可知矿工和创始人是往shielded pool 转账最多的人, 实际上占比可达76.7%. 而矿工占比达到63.7%, 这表明创始人并没有将很多ZEC放入pool中,毕竟创始人的ZEC是矿工的20%.

转账最多的用户,往pool转入超过10,000ZEC, 转账情况如图Figure 7所示.从这图可以看出来, pool中存款的大户仍然是创始人和矿工.

7.1 t-to-z和z-to-t交易之间建立联系

shield pool的最大作用是提供了一个匿名集, 用户通过t-to-z的转账之后再从z-to-t中提款,这样其他人就无法追踪提的款来自于哪里.但是如果把t-to-z和z-to-t这两种交易之间能够联系起来,这样在未来发生z-to-t的转账时可以把已确定名单的交易排除出去,这样就能够减小匿名集的大小.

最简单的方法是, 如果t-to-z中的t和z-to-t中的地址相同,那么就能排除一部分 shield pool 的匿名集合.于是实施这个想法的结果如图Figure 8a所示.实际上,通过这种方法,几乎没法将一些z-to-t交易和创始人的地址对应起来, 实际上,只能对应一部分矿工的地址.毕竟创始人不傻, 交易进入shield pool就是为了匿名,怎么可能再采用使用过的地址转出呢, 何况这个团队是以密码学为看家本领,所以不会犯这种错误,而只有对于矿工来说, 使用同样地址无所谓,因为对匿名性要求不高,能提款就好. 最终能与矿工地址对应起来的交易总共有49280笔,占所有z-to-t交易的13.3%.

7.1.1 将z-to-t中创始人的t-address识别出来

经过对创始人团队的地址分析,发现其中14个地址用于t-to-z的交易, 而其中每一笔t-to-z的交易每次转账都是249.9999ZEC, 这恰好是100个区块的奖励. 而另外只有5笔 249到251范围之间的t-to-z转账交易.基于这个特点,本来没法将t-to-z和z-to-t交易联系起来,但是这种模式给了作者灵感. 在所有的z-to-t交易中,没有发现249.9999的转账交易,但是发现了1953笔250.0001ZEC笔交易, 另外1969笔交易在249和251范围之间.于是作者检查了249.9999的t-to-z交易的频率,发现每笔交易之间间隔6~ 10个区块,再检查z-to-t的250.0001ZEC的交易时,发现1953中的1943笔交易的间隔大概是6~10个区块, t-to-z和z-to-t的交易,都像同一个模式, 这种模式的表现情况可以参看figure 9.

基于Figure 9 的这种情况,作者大胆做出一个启发式方法:

Heuristic 3. 任何z-to-t的交易中,如果转出250.0001ZEC, 那么这笔交易是由创始人发起的.

通过运行这个方法, 作者通过z-to-t交易, 额外发现了75个创始人的t-address, 这和之前的48个地址加起来,总共是123个地址.通过这一波操作, 可以找到创始人的z-to-t的交易, 对比之前的figure 8a, 此时得到的Fugire 8b.

7.1.2 将z-to-t中矿工的t-address识别出来

Zcash协议规定铸币交易产生的ZEC,必须先进入shield pool, 然后才能更使用, 正因为此, 很多矿池或者个人矿工在铸币交易之后还需要将地址中的ZEC转入shield pool, 使用的时候再从shield pool中取回. 由于每个矿池网站会公布自己挖出的区块信息, 这样每个铸币交易时转账的地址就可以和矿池对应起来. 于是可以统计出每个矿池随着时间增长的情况下转往poll的ZEC值得变化情况.

由于铸币交易存放在矿池的地址中, 矿池地址将ZEC转入pool之后把这些ZEC分发给自己的矿工, 每个矿池旗下都有很多个矿工,每个矿工都有自己的地址. 于是得出如下启发式方法.

Heuristic 4. 如果一个z-to-t的交易中有超过100个输出地址,只要其中1个地址属于已知的一个矿池地址,那么则认为这笔交易是矿池的withdrawl交易, 同时对其他输出地址标记为矿工的地址.

启用该方法分析后, 最终得到在z-to-t标记中,将110918个地址标记为矿工地址, 最终得到的结果如图Fig.8c所示. top10矿池的t-to-z和z-to-t交易的信息如Table 4所示.

7.1.3 识别其他实体交易

Heuristic 5. 如果一个z-to-t的交易中包含价值v的转账, 随后若干个区块时间间隔内的z-to-t的交易中的价值也是v, 则认为这笔交易时round-trip transaction.

这个假设看起来不那么靠谱,因为在若干个区块内t-to-z和z-to-t的两笔交易中的价值v相等的情况可能会很多,这种情况下没办法准确的将这些交易对应起来. 但是实际上经过分析发现,12,841笔不同面值的交易中, 其中9487笔交易的ZEC精确到了小数点后8位,其中的98.9%的交易,每笔交易的ZEC都精确到了小数点后3位.这些数据的特点,使得上述方法的实现成为了可能.

使用上述分析方法,最后识别出12841笔不同ZEC值的z-to-t和t-to-z的交易,转账总价值为 1,094,513.23684 ZEC, 其中97%的ZEC来自于矿工和创始人. 执行Heuristic 5中, 区块间隔分别设置为1~100,运行结果如图Figure 11所示. 当设置为10个区块间隔时, 可以关联到70%的z-to-t和t-to-z转账交易.

8.Shielded Pool内部的交互

文中作者分析了6,934笔z-to-z的交易, 其中包括8,444个JoinSplits. 其中93%的z-to-z交易仅仅使用1个JoinSplit作为输入. 1个JoinSplit中最多包括2个shield output作为input, 这表明大部分的z-to-z交易时以最多2个shielded output作为input. 作者不太确定 是不是一小部分用户进行了多次的交易,或者是很多用户仅仅做一次交易.这样的根本问题在于, shielded pool中z-address的个数有多少个, 并且控制他们的实体到底有多少. 实际上发现Bitclub Pool中t-to-z交易总共有196笔, 但是z-to-z交易有1516笔,这说明要么Bitclub Pool 在t-to-z之后进行了很多z-to-z的交易, 要么说明t-to-z之后还有返回的找零. 然而实际上BitClub总共只有200个z-to-t交易, 所以前者的概率更大.

9.案例分析:The Shadow Brokers

The Shadow Brokers(TSB), 是一个2016年兴起的黑客组织, 主要贩售美国国家安全局(NSA)制作的软件, TSB起先值接收Bitcoin的转账, 随后开始接收Zcash的转账.

作者首先翻看了TSB的博客(目前该博客的网址貌似打不开了), 在2017年5月, 该组织宣称他们开始接收Zcash作为他们的服务费, 2017年6月~8月收取Zcash和Monero, 但是9月份以后只收Zcash. Table 5展示了该组织从5月份开始到10月份,总共收到的ZEC.

为了识别出有关该组织的t-to-z交易, 首先排除矿工和创始人存储的有关100, 200, 400, 500的t-to-z的交易, 所以对于TSB的客户,有下述两个假设:

  • 他们的ZEC不是来自于z-to-t交易, 并应该是来自t-to-t交易,因为可以从交易所购买币种.
  • 他们不是经常使用ZEC的人,因此假设这个账户的交易次数在250以内.(250这个参数估计作者根据数据定的阈值)
  • 改地址所属的较大的群在1个月以内存入pool不超过1 ZEC(老实说,这个假设我没看明白是啥意思)
    最终得到24个疑似客户,结果如下Table 6所示.

10 结论

该论文对Zcash的交易情况作了深入的分析, 尤其是对其匿名性保证进行了检验, 为了检验Zcash的匿名性,作者利用了众多启发式的方法以及之前对其他加密货币用过的经验分析方法. 论文研究结果表明大多数的用户并没有很好地使用ZCash的匿名性,或者说大多数的用户并没有很好地使用ZCash的匿名性, 与shield pool 进行交互进行匿名的方式仍然留下了线索从而被识别出来, 这减少了ZCash 中的匿名集的范围, 也严重的损害了其他用户的匿名性.

闪电网络科普

发表于 2019-02-22 | Edited on 2023-03-05 | 分类于 区块链技术研究

闪电网络

在这里插入图片描述
很多人说闪电网络是比特币的未来,是趋势。但笔者始终觉得,如果不能理解底层的技术原理,就无以言对上层应用的深刻理解,更不足以谈对未来趋势的判断。接下来,我将在Aaron van Wirdum 编写的《闪电网络三部曲》的基础上,用更加通俗的语言介绍闪电网络。感谢Aaron van Wirdum绘制的交易结构图,这对我们理解闪电网络将会起到莫大的帮助。

理解闪电网络主要分为两步,一是理解双向支付通道,二是诸多通道扩展成闪电网络。

闪电网络想要解决的是比特币扩容、交易即时确认和手续费高的问题。举个例子来说明闪电网络整体思路,设想我们的老朋友Alice要给Bob转1个比特币,她该怎么做呢?

传统做法是Alice可以挑选出其未花费的输出用对应私钥签名,并向比特币网络广播,矿工验证打包,一般来说6个区块之后即可确认交易。这个过程很慢,需要等待一个小时左右,并且还要支付给矿工的手续费。于是呢,天才的程序员们碰撞出了闪电网络的解决方案。

操作过程是这样的,Alice和Bob先各自把5个BTC转给一个由两人共同控制的多重签名地址。这笔交易和比特币网络上其他普通交易没什么太大区别,只是转出的地址是一个多签地址。这个过程称为开启通道。

多重签名技术(multisig)是多个用户同时对一个数字资产进行签名。可以简单地理解为,一个账户多个人拥有签名权和支付权。如果一个地址只能由一个私钥签名和支付,表现形式就是1/1;而多重签名的表现形式是m/n,也就是说一共n个私钥可以给一个账户签名,而当m个地址签名时,就可以支付一笔交易。例如,多重签名2/3,表示3个人拥有签名权,而两个人签名就可以支付这个账户里的比特币;多重签名1/2,表示2个人拥有签名权,谁都可以单独来支配这笔资金。

开启通道后,这个多签地址里面就拥有10个比特币,这是被区块链记录了的,全网承认。接下来就是Alice和Bob私底下的交易了,不广播,不记在链上,正因如此,交易确认速度快,几乎零手续费(其实可能还有较低的路由费,后文会讲),这个过程称为链外交易,在交易通道(channel)中进行。(注意:有很多人问为什么闪电网络很快,我想说,没有第三方记账当然快啊。)

  1. 构建双向支付通道

什么是通道?怎么在通道进行交易呢?它安全吗?

简单来说,Alice和Bob都会在各自的小本本上记账,他们都知道对方怎么记的,且有密码学设计保证谁也不能多记耍赖。这当然也是由闪电协议精巧的设计保证的,后文再讲技术细节。

那么我们就可以想象出这样一个通道:在这个通道中,一开始Alice和Bob各有有5个,如果第一笔记“Alice有4个,Bob有6个”,这就相当于Alice给Bob转了1个比特币。如果,过了几天,Alice又要向Bob支付2个比特币,那么他俩会再记一次账,这次记“Alice有2个,Bob有8个”,同时上次记的“Alice有4个,Bob有6个”在两人共同确认后作废,也就是说,本次记账后,Alice只有2个比特币,她不能再拿出旧账单说“Alice有4个,Bob有6个”。

注意,在通道关闭之前,这10个比特币只能在Alice和Bob之间使用。也就是说,在不关闭通道的情况下,主网只知道多签地址有10个比特币,并不知道Bob已经拥有了其中的8个比特币,这就是所谓“双向支付通道”。

关于这个记账过程,EthFans翻译的《用算盘了解闪电网络》可以说很形象了。
在这里插入图片描述

之后Alice和Bob就可以在通道里过上你来我往的相互转账的愉快生活,远离主链的拥堵与高费用。这就好比俩人结婚了,夫妻们想要私下结算,只要俩人同意,想怎么算就怎么算。

天有不测风云,突然有一天,Alice不想和Bob这么转来转去了,想取出自己在通道里的钱去外面的花花世界潇洒快活。那么就需要关闭通道了,常有两种方式,一是协议离婚,如下图,这种方式很和平,双方共同从最开始的多签地址签名发起一笔交易分别转到两人各自控制的地址对应数额的比特币,同时将之前记在小本本上的所有旧账一笔勾销。
在这里插入图片描述
二是起诉离婚,Alice想离而Bob不想离,这时Alice可以单方面强制关闭通道,将小本本最后一笔交易广播出去,只要矿工验证并打包进区块,这婚也算离了,代价是Alice并不能立马得到比特币,需要等待一定时间。本着劝和不劝分的原则,闪电协议设置了哈希时间锁定合约,单方面强制离婚(关闭交易通道)会受到延迟收到退款的惩罚,这是为了保证双方交易的稳定。

以上最后一个过程是通道关闭。注意,不管是协议离婚还是起诉离婚,这都是要法院受理登记的。关闭通道一定要发起交易并广播到主网,最后矿工记录,所以还是要忍耐一定确认时间和支付手续费的,这与闪电网络无关。

至此我们已经知道了Alice和Bob链下互相转账的那点事儿了,这就是所谓“双向支付通道”。开启通道需要在主链交易,这是锁定资金,关闭通道也需要在主链交易,这是释放资金。中间可以进行任意多次转账支付,是0确认0手续费的。

  1. 将双向支付通道扩展成闪电网络

新问题来了,世界上除了这两位,还有Carol、Eric、Diana等等。设想Alice想转给Carol 1个BTC,她该怎么办呢?自然地,她俩可以再重复上述操作建立一个双向通道。但是,如果我们为了应用闪电网络,需要世界上每两个人之间都建立一条通道,这将是非常大的工作量且不切实际的。为了解决这一问题,我们需要将双向支付通道扩展成闪电网络。

假如Bob和Carol之间已经建立了支付通道,而Alice和Bob之间也有支付通道,那么Alice可以先把钱转给Bob再由他转给Carol,即Bob充当了支付的中间人,在网络里他就是一个路由节点。

在这里插入图片描述
如上图,B和C,A和B之间有通道, A和C就通过B来达成交易。更一般地,A和F可以经过B、D来交易。

当很多的节点相互建立通道,最后就会形成闪电网络。
在这里插入图片描述

闪电网络原理技术细节版

通过上文,我们差不多了解了闪电网路是如何形成的。但是看完大家一定会觉得有哪里不对劲。哪里不对劲呢?

我们来回顾一下历史。

如果Alice和Bob完成了一笔交易,他们手头各自都有账本,在没有第三方见证的情况下,他们都可能把账本按照对自己有利的方向进行篡改。银行是怎么解决这个问题的呢?在传统的银行业中,由于Alice和Bob都信任银行,因此银行充当了双方都信任的第三方来进行记账,并且以第三方的账目为准,因此双方不管怎么篡改账本都没用。区块链是怎么解决这个问题的呢?区块链同样引入了第三方来充当记账者,虽然Alice和Bob都不信任记账者,但系统会想尽办法来保证记账者的诚实性。

但是到了闪电网络,请注意,这里再也没有一个第三方记账者了!Alice和Bob又重新拿回了他们的小本子,各自记起了各自的账本。问题在于怎么保证他们都诚实记账!

1.双方支付通道:如何使记账的双方保持诚实?

这是一个非常有意思的问题,使得我们的第一步——建立“双向支付通道”,变得难以维持了。那么,Alice和Bob这样两个完全不信任对方的陌生人,究竟该如何在没有主链矿工记录的情况下,相互转账交易?

作为铺垫,我们需要讲解两个概念,哈希时间锁定和哈希密钥锁定。首先是哈希时间锁定,这是在交易脚本里面设置时钟,必须要等设定时间之后,才能用地址的私钥签名解锁地址里的比特币。例如Alice收到了一笔2 BTC转账,但是对方设定了1000个区块之后才能解锁,所以Alice必须等待1000个区块之后才能用自己的私钥签署交易,花费其中的BTC转给Bob。

其次是哈希密钥锁定。哈希函数可以把一串输入转换成256位固定长度的输出,计算过程称为一次哈希运算,其中输入称为密文,输出称为密文的哈希值。哈希函数具有单向性,即从密文可以算出哈希值,但是从哈希值反向算出密文几乎是不可行的。计算的办法是暴力破解,逐一输入密文进行哈希运算,验证运算结果是否为要求的哈希值。基于这种特性,可以把一个密文的哈希值放入交易的输出当中充当哈希密文锁,也就是必须得输入该哈希值对应的密文才能解锁脚本中的比特币。例如,例如Alice收到了一笔2BTC转账,但是对方设定了哈希值锁定,所以Alice必须得到交易方的密文,同时配合自己的密钥签名才能签署交易,花费其中的BTC转给Bob。

在这里插入图片描述

有了这两个工具,让我们看看那群程序员天才们是如何构想出一个程序,使得互不相识的双方能够诚实记账的。

在原理的白话版我们已经讲过了关于通道的三个步骤:开启通道,通道内交易,关闭通道。

开启通道较为简单,Alice和Bob分别向多签地址1转入5个BTC。这是一个2/2地址,也就是必须两人都签名,此地址的比特币才可以转出去。

在这里插入图片描述

接下来是通道内交易,我们需要讲解Alice和Bob之间的两次交易才能完全明白双向支付通道的巧妙之处。第一次Alice需要向Bob支付1个BTC,第二次Bob需要向Alice支付1个比特币。

第一次交易的流程是,Bob首先在自己电脑的闪电网络软件上构建交易,如下左图所示。

在这里插入图片描述

Bob在构建交易时需要通过闪电网络软件的通信模块和Alice建立联系,获得Alice创建的密文的哈希值,然后把这个哈希值作为哈希锁放在自己构建的交易里。这笔交易Bob把10个比特币分别转给Bob控制的普通地址6个和另一个“多签地址2”4个BTC。(通俗来讲,就是A和B的财产放在一起,但是B主动从A那里要了一把锁把A的财产锁住了,没有A的钥匙B也无法打开。)

多签地址2是一个1/2地址,也就是两个条件有一个满足即可解锁。具体来说,需要Bob用自己的私钥和Alice的密文(此时Bob只有密文的哈希值,并不知道密文,所以Bob是不可能获得这4个比特币的)同时来解锁;或者Alice等待1000个区块后用私钥来解锁。如下图,这两个条件是双向支付通道的精髓所在,请先记住它,稍后分析中会讲设计的原因。

在这里插入图片描述

Bob构建完交易后会签名,然后把这笔未完成的交易以点对点方式发送给Alice,而不是广播到全网。显然,上述交易是对Bob有利的,一旦Alice签名并广播,Bob可以立即获得6个比特币,而Alice需要等到1000个区块之后才能拥有4个比特币。这也就是上文提到的单方面“起诉离婚”会受到延时惩罚的技术实现细节。然而,这笔对Bob有利的交易的主动控制权却掌握在Alice手里,因为Alice不签名并广播的话,这笔交易暂时不会生效的。

在Bob创建这笔对自己有利的交易同时,Alice也创建了类似的一笔对自己有利的交易,两者是一种镜像。这个过程相当于是Alice帮Bob在他的小本本上记了一笔账,这10个比特币Bob占6个,Alice占4个,同理Bob也帮Alice记账了。具体来说,就是Alice电脑里保存着Bob创建并签名的未完成交易,Bob保存着Alice创建并签名的未完成交易。两者合在一起,就完成了他们之间第一笔交易的记账过程,完整过程如下图。

这个过程并不需要互相信任,只需双方同时在线,建立联系并交换哈希值,再在各自的电脑里创建交易最后发送给对方。整个过程不需要经主链由矿工打包确认,所以非常快速并且没有手续费。也可以看到,任何一方都可以随时强制关闭通道,将自己占主动权的交易签名并广播全网,代价是1000区块延时,如何理解1000区块的延迟呢,Bob写的交易此时在Alice手中,Alice写的交易在Bob手中,假若Bob单方面对Alice写的交易进行签名后广播,这个交易Alice可以立马拿到4BTC,但是Bob需要等待1000个区块之后才能拿到6个BTC,这就是单方面撕毁合约的惩罚.

但是这里仍然有一个问题,就是外界无法知道通道内的交易次序,因此无法鉴别通道关闭后广播出去的交易,是否为最终交易。例如,如果双方在这个通道里不断发生交易,最后导致Alice手中有9个,Bob手里有1个,但假设最后Bob强制关闭交易通道,并广播出去Alice有5个,Bob有5个,Bob便能凭空赚得4个。(虽然这4个要等到1000个区块后才能获得,但这是值得的。)该怎么解决这个问题呢?

这次我们就要再次用到上文提到的哈希密钥锁了。

现在我们考虑过了两天,Bob要向Alice转1个BTC,即双方发生第二笔交易B。类似他们仿照上述第一笔交易操作进行第二次记账,此时应当是Alice 5个,Bob 5个。

**一个最大的区别是建立第二笔交易B之前,两人会相互交换第一笔交易中的密文,即对方第一把锁的钥匙。**这么做的目的在于作废第一笔交易记录A,使得两人都只能承认最新的交易记录B有效。

设想Bob在第一笔记录中拥有6个比特币,而第二笔记录变成了5个,那么如果他想作弊去签名并广播第一条记录呢?

结果是他将失去通道内所有的比特币!

因为Bob签名并广播了下图交易之后,Alice立马会获得4个BTC,同时Bob则必须等待1000个区块之后才能解锁6个BTC。然而,由于此时Alice已经获得了密文即钥匙1,所以Alice可以赶在Bob之前解锁这6个BTC。综合来看,只要Bob想要广播旧交易记录,他就会一无所有。

在这里插入图片描述

有了能作废旧账的保证,双方就可以在通道内反复任意多次交易,每次交易之后的状态都是资金池资金的划分比例的最新确认状态。

最后,关闭通道。如本文第二部分所讲,有两种方式关闭通道,一是单方面强制关闭,即某一方将自己控制的最新交易签名后广播出去即可。二是商议后关闭,此时双方再从最开始的多签地址构建一笔交易。

至此,我们明白了如何在无信任的条件下如何建立双向支付通道。

2.闪电网络:如何使路由节点保持诚实?

同样的,在建立闪电网络的时候,我们同样会遇到信任问题:Alice想转给Carol 1个BTC,需要经过Bob,但Bob会担心自己给Carol转1BTC后,Alice耍赖;同样Alice会担心如果先给Bob转了1BTC,Bob也耍赖不转给Alice。在传统的金融系统中,是由大型知名金融中介机构的信用提供保证的。但闪电网络中,并没有这样一个独立于交易者的第三方去提供信用担保。

闪电网络采用了一种HTLC(哈希时间锁定合约)完美解决了这个问题。

在这里插入图片描述

过程是这样的,第一,Carol会选择一个随机密文并运算得到其哈希值,再将此哈希值交给Alice。第二,Alice拿到哈希值后,会构建一笔转账给Bob的交易。这笔交易需要Bob拿到Carol的密文才能解锁,如果Bob在限定的时间内没有解锁成功,这笔钱则退回给Alice。第三,Bob从Alice处拿到哈希值,他也构建一笔转账给Carol的交易,Carol必须拿密文来解锁。第四,当Carol提供密文从Bob处获得1个BTC,Bob立马会拿密文从Alice处获得1个BTC,这就完成了从Alice给Carol转账的任务。

上述过程可以看作一个智能合约。故事类似于这样:A想经过B转账给C,那么C先给A一把锁,C有钥匙A有钱。A跟B说,你从C那里拿到了钥匙,我的钱就是你的了。B就拿着锁去找C,用钱跟C换钥匙,然后拿钥匙去换A的钱。如此一来,就实现了钱和锁从A到B再到C,钥匙从C到B再到A的一个流转。

当然,在实际操作过程中,Alice给Bob转账金额需要大于1个BTC,支付必要的路由费以激励Bob充当路由节点。其次,要注意两笔交易之间的哈希时间长度设置,第二步时间必须长于第三步时间。如果Bob在Alice关闭交易之后拿到Carol的钥匙,他将无法找Alice拿回1个BTC。

在这里插入图片描述

到这里,我们已经明白了闪电网络中通过路由节点达成交易的技巧,最后一步只需把之前两步整合进交易即可,就不再赘述了。

参考链接

原文链接
Understanding the Lightning Network, Part 1
Understanding the Lightning Network, Part 2
Understanding the Lightning Network, Part 3

EOS中基本的数据结构解析

发表于 2019-02-21 | Edited on 2023-03-05 | 分类于 区块链技术研究

本文用于记录对EOS源代码的阅读记录,对其相关内容从源代码中追踪问迹,希望从源代码入手,对其设计原理有一个深入的认识,也用于本人学习研究之用.
如果对EOS不太了解, 还需要对EOS顶层的内容有一些了解.这里推荐EOS的白皮书进行了解学习.

对任何区块链相关技术的学习,首先应该从其区块的结构开始学起,因此,本文首先从区块源代码入手开始了解.

EOS区块链相关数据结构

block header

block header的定义,来自于"chain\webassembly\block_header.hpp"文件中,其主要结构如下:

字段 名称 大小(Byte) 含义
timestamp 时间戳 4 生产区块的时间
producer 生产者 8 生产区块的超级节点
confirmed 确认数 2 区块的确认数
transaction_mroot 交易的Merkle Root 32 区块中全部交易的默克尔数的哈希值
action_mroot action的Merkle Root 32 区块中全部action的默克尔数的哈希值
schedule_version 版本号 4 见证人排序版本号
new_producers 下一个见证人 - 区块的下一个见证人,可以为空
header_extensions 扩展类型 - vector<std::pair<uint16_t,vector>>
- - - -

具体对于block_header的结构代码,可以参看下述代码。

1
2
3
4
5
6
7
8
9
10
11
12
13
14
15
16
17
struct block_header
{
block_timestamp_type timestamp;
account_name producer;
uint16_t confirmed = 1;
block_id_type previous;
checksum256_type transaction_mroot; /// mroot of cycles_summary
checksum256_type action_mroot; /// mroot of all delivered action receipts

uint32_t schedule_version = 0;
optional<producer_schedule_type> new_producers;
extensions_type header_extensions;
digest_type digest()const; // 求区块的摘要
block_id_type id() const; // 获取区块id
uint32_t block_num() const { return num_from_id(previous) + 1; } //当前区块号 = 前一个区块号+1
static uint32_t num_from_id(const block_id_type& id);
};

上述区块是没有对区块进行签名的区块,对区块进行签名之后,区块数据结构是signed_block_header,具体代码如下:

1
2
3
4
struct signed_block_header : public block_header
{
signature_type producer_signature;// 区块生产者的签名
};

block数据结构

EOS中block的数据结构如下,里面只有两个数据结构,即保存交易的vector和block_extensions。
block不能进行引用,只能进行复制。

1
2
3
4
5
6
7
8
9
10
11
12
13
14
15
struct signed_block : public signed_block_header
{
private:
signed_block(const signed_block &) = default;

public:
signed_block() = default;
explicit signed_block(const signed_block_header &h) : signed_block_header(h) {}
signed_block(signed_block &&) = default;
signed_block &operator=(const signed_block &) = delete;
signed_block clone() const { return *this; }

vector<transaction_receipt> transactions; /// new or generated transactions
extensions_type block_extensions;
};

Transaction_header数据结构

transaction_header包含了固定大小的与每一笔交易都相关的一些数据,与transaction_body独立开来,这样在解析交易的时候不需要进行动态内存分配,这就加快了交易的解析过程。

所有的transaction都有一个截止时间,超过这个截止时间之后不会记录在链上,一旦某个区块的时间戳大于某个交易的截止时间,那么这个交易就永远不会包含在区块中。

其数据结构如下:

1
2
3
4
5
6
7
8
9
struct transaction_header {
time_point_sec expiration; ///< the time at which a transaction expires
uint16_t ref_block_num = 0U; ///< specifies a block num in the last 2^16 blocks. 2bytes
uint32_t ref_block_prefix = 0UL; ///< specifies the lower 32 bits of the blockid at get_ref_blocknum 区块号低4位的前缀 4bytes
fc::unsigned_int max_net_usage_words = 0UL; /// upper limit on total network bandwidth (in 8 byte words) billed for this transaction 4bytes
uint8_t max_cpu_usage_ms = 0; /// upper limit on the total CPU time billed for this transaction 1bytes
fc::unsigned_int delay_sec = 0UL; /// number of seconds to delay this transaction for during which it may be canceled.4bytes

};

transaction

每一个transaction都包括了一系列的action,action中要么全部被执行,要么全部不执行,一个transaction的结构如下。

1
2
3
4
5
struct transaction : public transaction_header {
vector<action> context_free_actions;
vector<action> actions;
extensions_type transaction_extensions;
};

signed_transaction

每一个signed_transaction继承于transaction,多了签名和一些其他数据,其数据结构如下:

1
2
3
4
5
6
struct signed_transaction : public transaction
{
vector<signature_type> signatures;// 一笔交易可能需要多个签名
vector<bytes> context_free_data; ///< for each context-free action, there is an entry here

};

EOS中的操作(action)

EOS区块链中的交易是由一个个操作组成的,操作可以理解成一个能够更改区块链全局状态的方法,操作的顺序是确定的,一个交易内的操作要么全部执行成功,要么都不执行,这与交易的本意(transaction)是一致的。操作是区块链的最底层逻辑,相当于区块链这个大脑的神经元,区块链的智能最终也是通过一个个操作的组合来实现的。

操作的设计思路

操作的来源

一个操作可以通过两种途径产生:

  • 由一个账号产生,通过签名来授权,即显性方式。
  • 由代码生成,即隐形方式。

操作的底层逻辑

操作的设计遵循React Flux设计模式,简单的说就是每一个操作将会被赋予一个名称,然后被分发给一个或者多个handler。在EOS环境中,每个操作对应的handler是通过scope和name来定义的,默认的handler也可以再次将操作分发给下一级的多个handler。所以,每个EOS应用可以实现自己的handler,当操作被分发到这个应用时,相应的handler的代码就会被执行。

操作的设计思路中另一重要概念是授权。每一个操作的执行都必须确保具备了指定账户的授权。授权通过许可(permission)的方式声明,对于一个授权动作,账户可以要求任意数量的许可,许可的验证是独立于代码执行的,只有所有规定的许可被成功验证之后,对应的代码才能够被执行。

操作的数据结构

1
2
3
4
5
6
7
struct action {
account_name account;// 操作的来源
action_name name; // 操作的名称
vector<permission_level> authorization;// 执行操作的许可列表
bytes data;// 执行action需要用到的数据
...
};

action中有一个permission_level,指的是权限级别一个账户可以将权限授予任意多个账户,同时每个账户可以有不同的权限名。权限级别的数据结构如下。

1
2
3
4
struct permission_level {
account_name actor; // 授予的账户名称
permission_name permission; // 授予账户的权限
};

关于许可的相关内容,可以参看账户和权限

链控制器

上述内容是内核的基本组成部分,如同一个机器的零部件,然而,要让机器运转起来,还需要把这些零部件串起来的控制中心,而链控制器(chain_controller)就是这个控制中心。下面我们来详细介绍EOS的链控制器。

链控制器的基本功能

首先,我们需要理解链控制器存在的主要目的是作为外部世界与区块链内核之间的交互界面,所以它有着承上启下的作用,承上为支撑区块链与外部的交互,启下为管理区块链内部的状态变更。所以,从理解的不同角度,链控制器可以被理解为以下两个概念:

  • 从外部视角,链控制器是一个数据库,这与链外对区块链的理解是一致的,从狭义的角度看,区块链就像一个不可更改的数据库,而链控制器可以看做这个数据库的管家,外部世界不用直接与区块链底层通信,而是通过这个管家来与区块链交互。

  • 从内部视角,链控制器是一个协调者,区块链内部各个部件均独立运作,这与上述的设计原则是一致的,这样的话,各个部件之间如何调度与协调,就需要一个有全局视角的角色来统一管理,这就是链控制器的第二个作用.
    用作者的原话来说,链控制器的目的是以一种可以扩展的方式来跟踪区块链的状态变化。

链控制器的基本要素

为了维护可靠的区块链状态,链控制器管理着两个不用类型的数据库:

  1. 区块日志。它的作用是存储已经经过验证的不可逆转的区块链主干。
  2. 块数据库 这是一个带索引的可以增删改查的数据库。它的作用是维护和管理未经验证的区块链主干与分支两个子数据库,主干数据库存储的是当前长度最长的一条链,而分支存储的是因为不同分叉而造成的分支链,随着时间的推移,主链是有可能被分支替代的,每当一个新的区块要写入时,EOS都会重新计算各分支和主干的长度,并且决定要不要切换主干。最后,执行错误或者验证不通过的区块最终会被抛弃,并从数据库中清理出去。

除了存储部分,链控制器还需精确维护一个消息机制,以保证对区块链中的其他成员广播最新的区块状态变更,这个消息机制是区块链网络能够正常和自主运行的基础。

事务处理机制

熟悉数据库的读者一定知道,对于数据库的写入操作,维持一个事务的原子性是很关键的,也就是说,对于一批写入操作,要么全都成功执行,要么都不执行,一定不能出现只执行了其中一部分的情况,因为这样将导致数据的不一致性,这样的错误是致命的。EOS中对于块数据库的写操作采用同样的设计原则,事务的使用主要体现在两个层面:

  1. 区块. 整个区块的内容是一个整体,要么全都写入,要么都不写入
  2. 交易. 一个交易是一个整体,其中的操作要么都执行,要么都不执行
    当事务中的某个步骤出现错误时,整个事务就会启动回滚机制,整个区块链将会恢复到这个事务发生之前的状态。

链控制器的主要过程

  • 链控制器的初始化
    链控制器的初始化是区块的起点,它的核心过程如下所示:
1
2
3
4
5
6
7
8
9
10
11
12
13
14
15
16
17
18
19
20
21
22
23
24
25
26
27
28
29
30
31
32
33
34
35
36
37
38
39
40
41
42
   controller_impl( const controller::config& cfg, controller& s  )
:self(s),
db( cfg.state_dir,
cfg.read_only ? database::read_only : database::read_write,
cfg.state_size ),
reversible_blocks( cfg.blocks_dir/config::reversible_blocks_dir_name,
cfg.read_only ? database::read_only : database::read_write,
cfg.reversible_cache_size ),
blog( cfg.blocks_dir ),
fork_db( cfg.state_dir ),
wasmif( cfg.wasm_runtime ),
resource_limits( db ),
authorization( s, db ),
conf( cfg ),
chain_id( cfg.genesis.compute_chain_id() ),
read_mode( cfg.read_mode ),
thread_pool( cfg.thread_pool_size )
{

#define SET_APP_HANDLER( receiver, contract, action) \
set_apply_handler( #receiver, #contract, #action, &BOOST_PP_CAT(apply_, BOOST_PP_CAT(contract, BOOST_PP_CAT(_,action) ) ) )

SET_APP_HANDLER( eosio, eosio, newaccount );
SET_APP_HANDLER( eosio, eosio, setcode );
SET_APP_HANDLER( eosio, eosio, setabi );
SET_APP_HANDLER( eosio, eosio, updateauth );
SET_APP_HANDLER( eosio, eosio, deleteauth );
SET_APP_HANDLER( eosio, eosio, linkauth );
SET_APP_HANDLER( eosio, eosio, unlinkauth );
/*
SET_APP_HANDLER( eosio, eosio, postrecovery );
SET_APP_HANDLER( eosio, eosio, passrecovery );
SET_APP_HANDLER( eosio, eosio, vetorecovery );
*/

SET_APP_HANDLER( eosio, eosio, canceldelay );

fork_db.irreversible.connect( [&]( auto b ) {
on_irreversible(b);
});

}
<12345>
博主

博主

© 2023 博主
由 Hexo 强力驱动 v6.3.0
|
主题 – NexT.Pisces v6.6.0
本站总访问量 次 | 本站访问人次